Objectives
Modern AI innovations require proper infrastructure, especially concerning data throughput and storage capabilities. While GPUs drive faster results, legacy storage solutions often lag behind, causing inefficient resource utilization and extended times in completing the project. Traditional enterprise storage or HPC-focused parallel file systems are costly and challenging to manage for AI-scale deployments. High-performance storage systems can significantly reduce AI model training time. Delays in data access can also impact AI model accuracy, highlighting the critical role of storage performance.
Xinnor partnered with DELTA Computer Products GMBH, a leading system integrator in Germany, to build a high-performance solution designed specifically for AI and HPC tasks. Thanks to the use of high-performance NVMe drives from Micron, efficient software RAID from Xinnor, and 400Gbit InfiniBand controllers from NVIDIA, the system designed by Delta ensures a high level of performance through NFSoRDMA interfaces, both for read and write operations, that is crucial for reducing checkpoint times typical of AI projects and for handling possible drive failures. NFSoRDMA enables parallel access for reading and writing from multiple nodes simultaneously. The 2U dual sockets server used by Delta and equipped with 24x 7450 NVMe 15.36 from Micron allows storage of up to 368TB and provides theoretical access speeds of up to 50GBps. In this document we’ll explain how to set up the system with xiRAID to saturate the InfiniBand bandwidth and provide the best possible performance to NVIDIA DGX H100 systems.
In addition, we’ll showcase the capabilities of xiRAID software. xiRAID represents a comprehensive software RAID engine, offering a range of features tailored to address diverse storage needs.
Finally, this report provides a detailed instruction manual for achieving optimal and consistent performance across various deployments.
Test Setup
- Motherboard: Giga Computing MZ93-FS0
- CPU: 2xAMD EPYC 9124
- RAM: 756GB
- Storage: Micron 7450 (15.36TB) x 24
- Boot drives: Micron 7450 (960GB) x 2
- Network: NVIDIA ConnectX-7 400Gbit
- OS: Ubuntu 22.04.4 LTS (Jammy Jellyfish)
- RAID: xiRAID 4.0.3
Client 1:
- NVIDIA DGX H100
- Intel(R) Xeon(R) Platinum 8480CL
- 2063937MB RAM
- Network InfiniBand controller: Mellanox Technologies MT2910 Family [ConnectX-7]
Client 2:
- NVIDIA DGX H100
- Intel(R) Xeon(R) Platinum 8480CL
- 2063937MB RAM
- Network InfiniBand controller: Mellanox Technologies MT2910 Family [ConnectX-7]
Testing Approach
We conducted tests of synchronous and asynchronous file access modes to demonstrate the difference in performance between the two approaches. Synchronous mode means that the host receives confirmation of the write only after the data has been written to the non-volatile memory. This mode ensures data integrity and more stable performance. In asynchronous mode, the client receives confirmation of the write when the data is saved in the page cache of the server. Asynchronous mode is less sensitive to storage-level delays and thus to array geometry, but it may provide an unstable level of performance, varying depending on the level of cache fill, and may lead to data loss in case of power outage and lack of proper tools to protect the cache itself.
If supported by the application, Xinnor recommends using synchronous mode.
RAID and File System Configuration
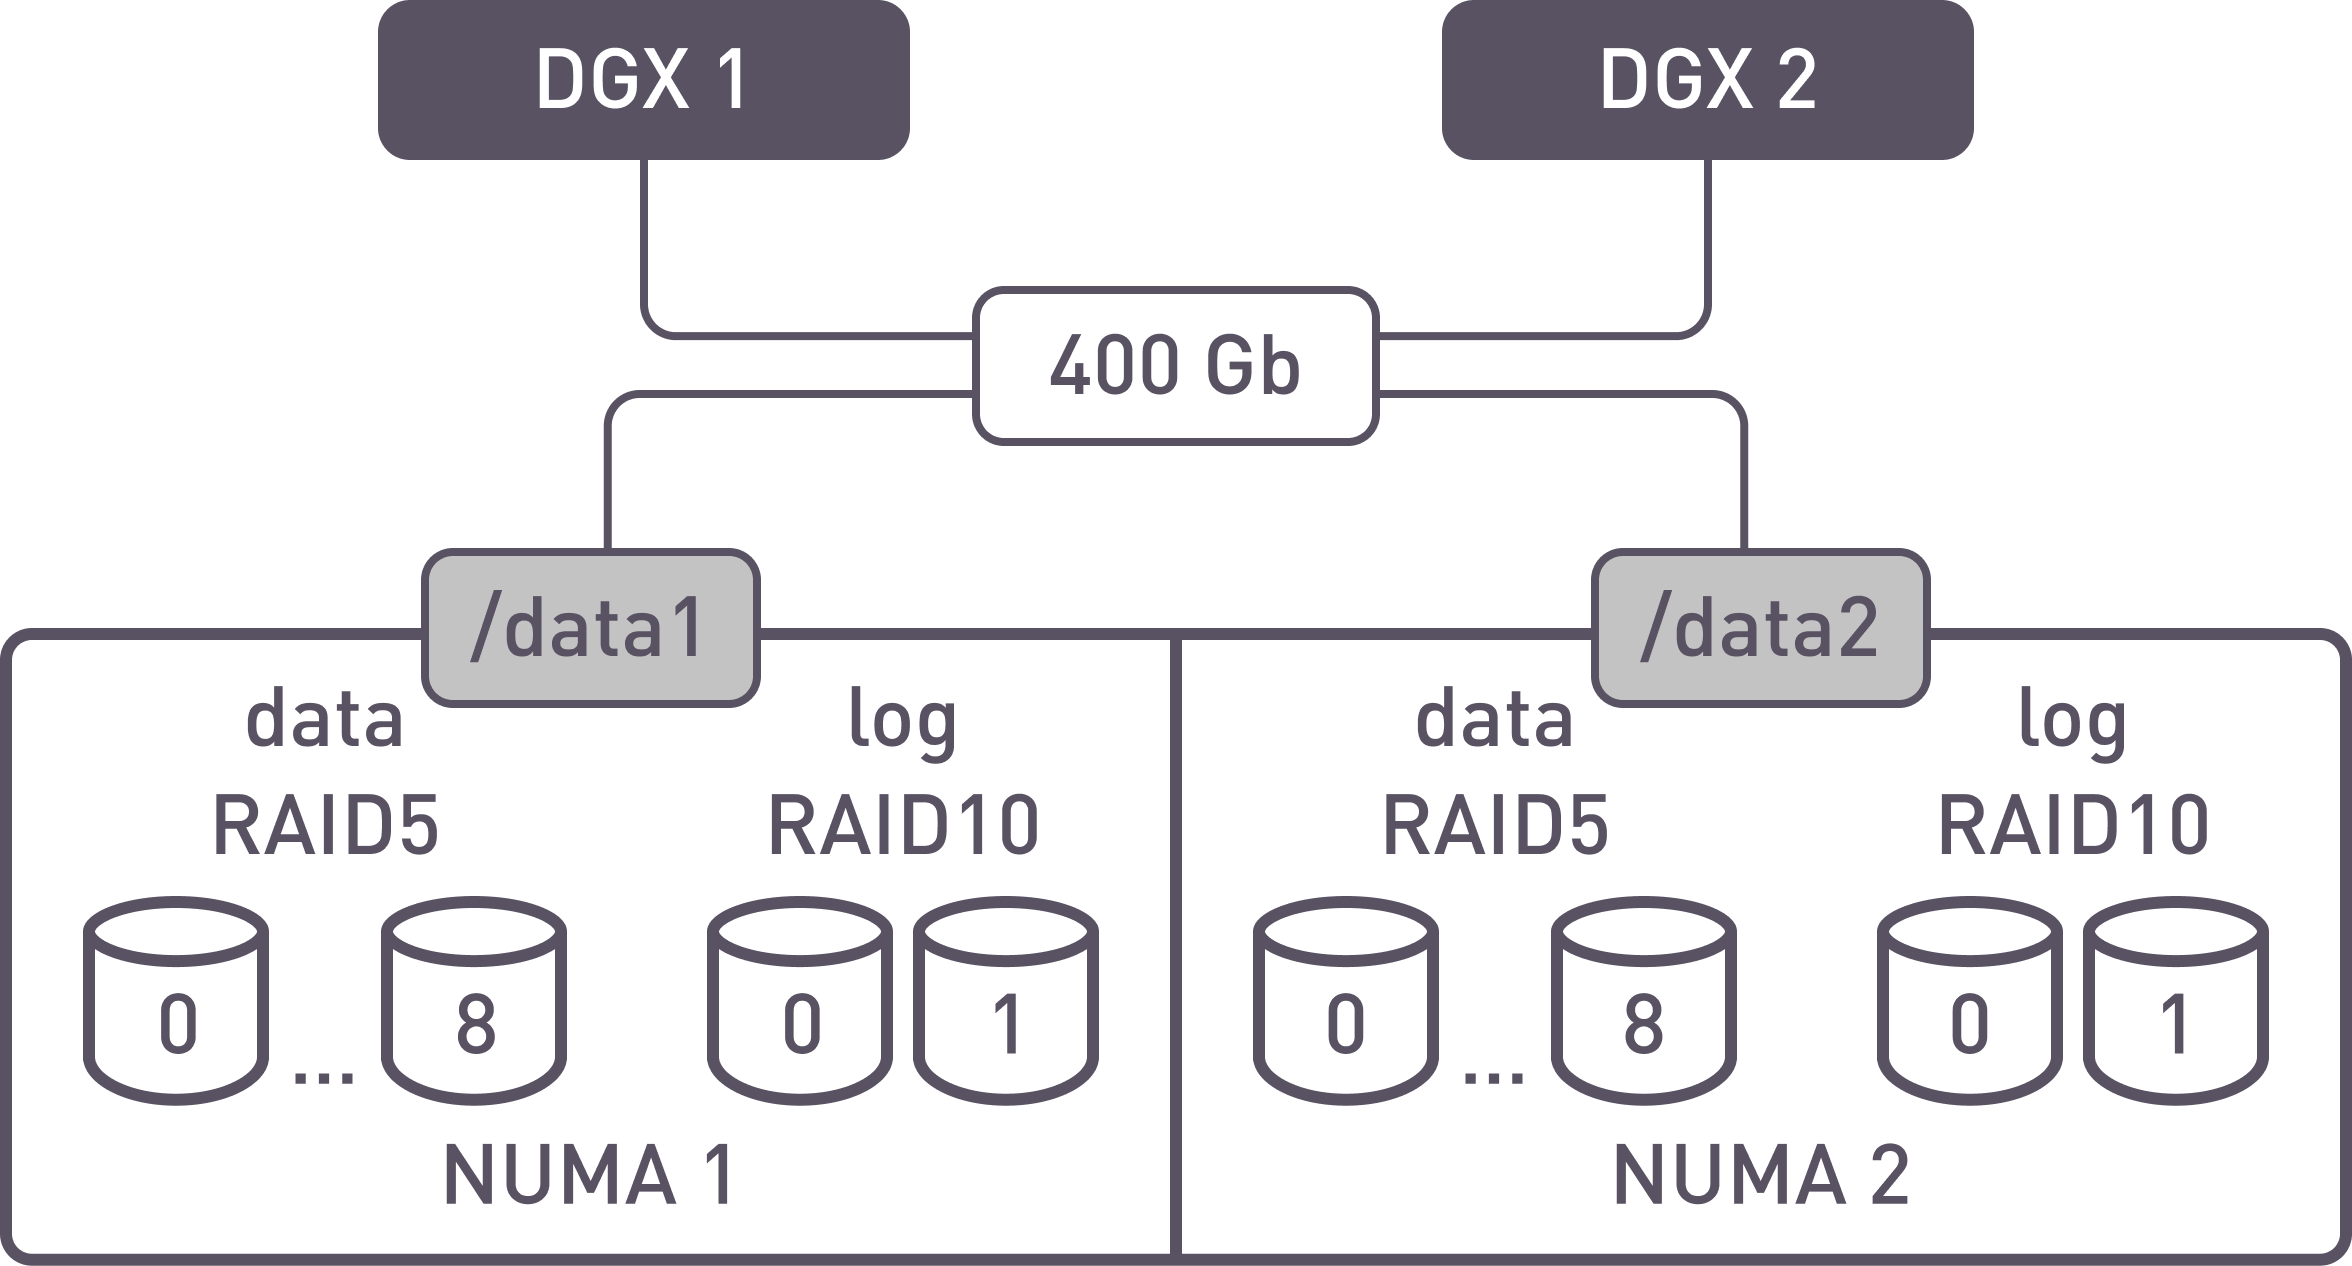
To achieve the best results in synchronous mode, it is necessary to correctly configure the array geometry and file system mounting parameters. In our case, we will create 1 RAID50 array with 18 drives, with a chunk size of 64k. For the journals, we will create a RAID1 from 2 drives (for each parity RAID), so that small log IOs will not interfere with writing large data blocks. This geometry allows us to aligne to 512kb blocks and consequently, to achieve better sequential write results, due to the reduced read-modify-write (RMW) operations. The alternative to this configuration could be 2 RAID5 where each RAID belongs to the dedicated NUMA node. In this testing we don’t see great value for NUMA affinity approach, but in some server configurations it may significantly help. It is worth mentioning that one xiRAID software instance supports unlimited number of RAIDs.
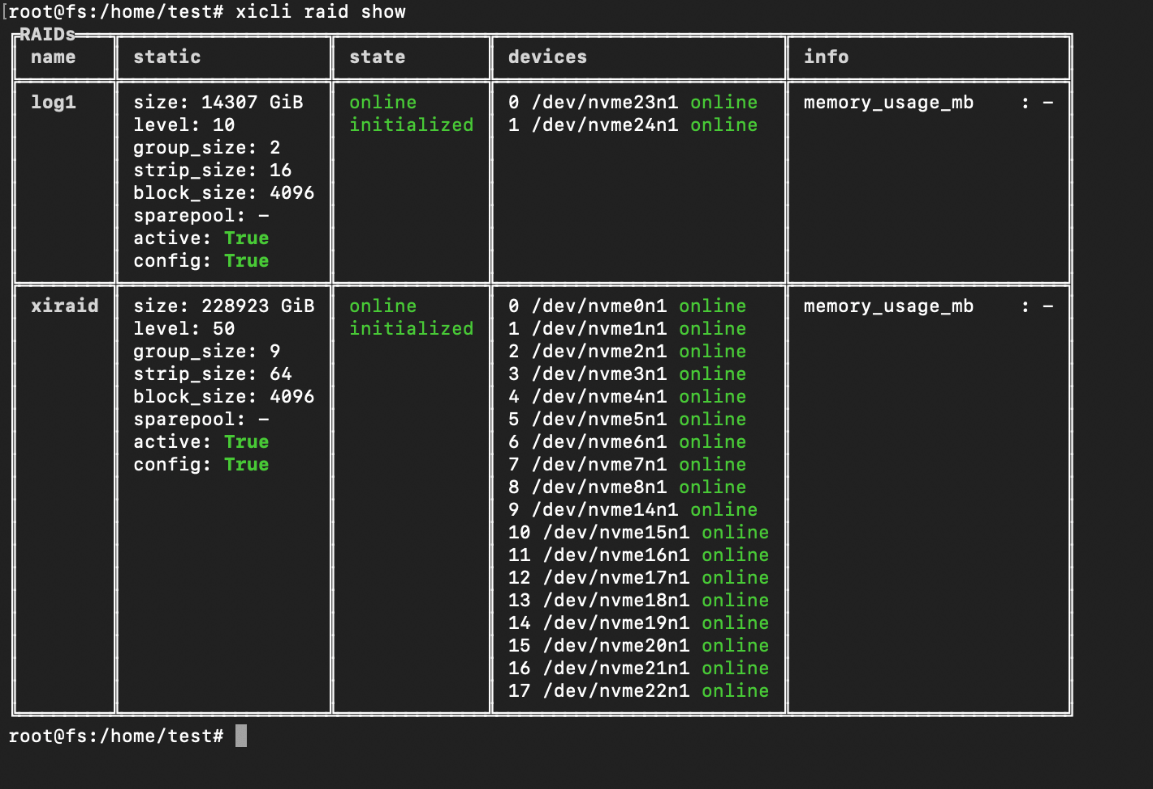
Example array for 1 shared folder
Possible Array Configuration Schemes
Scheme 1
First testing configuration
Two arrays are created for data from 9 drives in RAID 5 or 10 drives in RAID 6, and 2 mirrors for the logs. Two file systems are created where RAID with parity is used for data and mirror for the log. The file systems are exported as two independent shared folders.
Pros:
- Maximum performance, minimizing interaction via inter-socket link;
- If IO is a multiple of 256k, there are no RMW operations;
- Small IO does not affect performance stability.
Cons:
- Only 16 drives out of 24 are used for data;
- 2 separate shared folders are needed.
Scheme 2 – the one used in this document

Second testing configuration
A single RAID50/60 is created from 18/20 drives and a mirror of two drives. One file system (data + log) is created and exported as a single shared folder.
Pros:
- If IO is a multiple of 256k, there are no RMW operations;
- Unified data volume for all clients;
- Small IO does not affect performance stability.
Cons:
- Not all drives are used for data;
- NUMA may affect overall performance.
Scheme 3
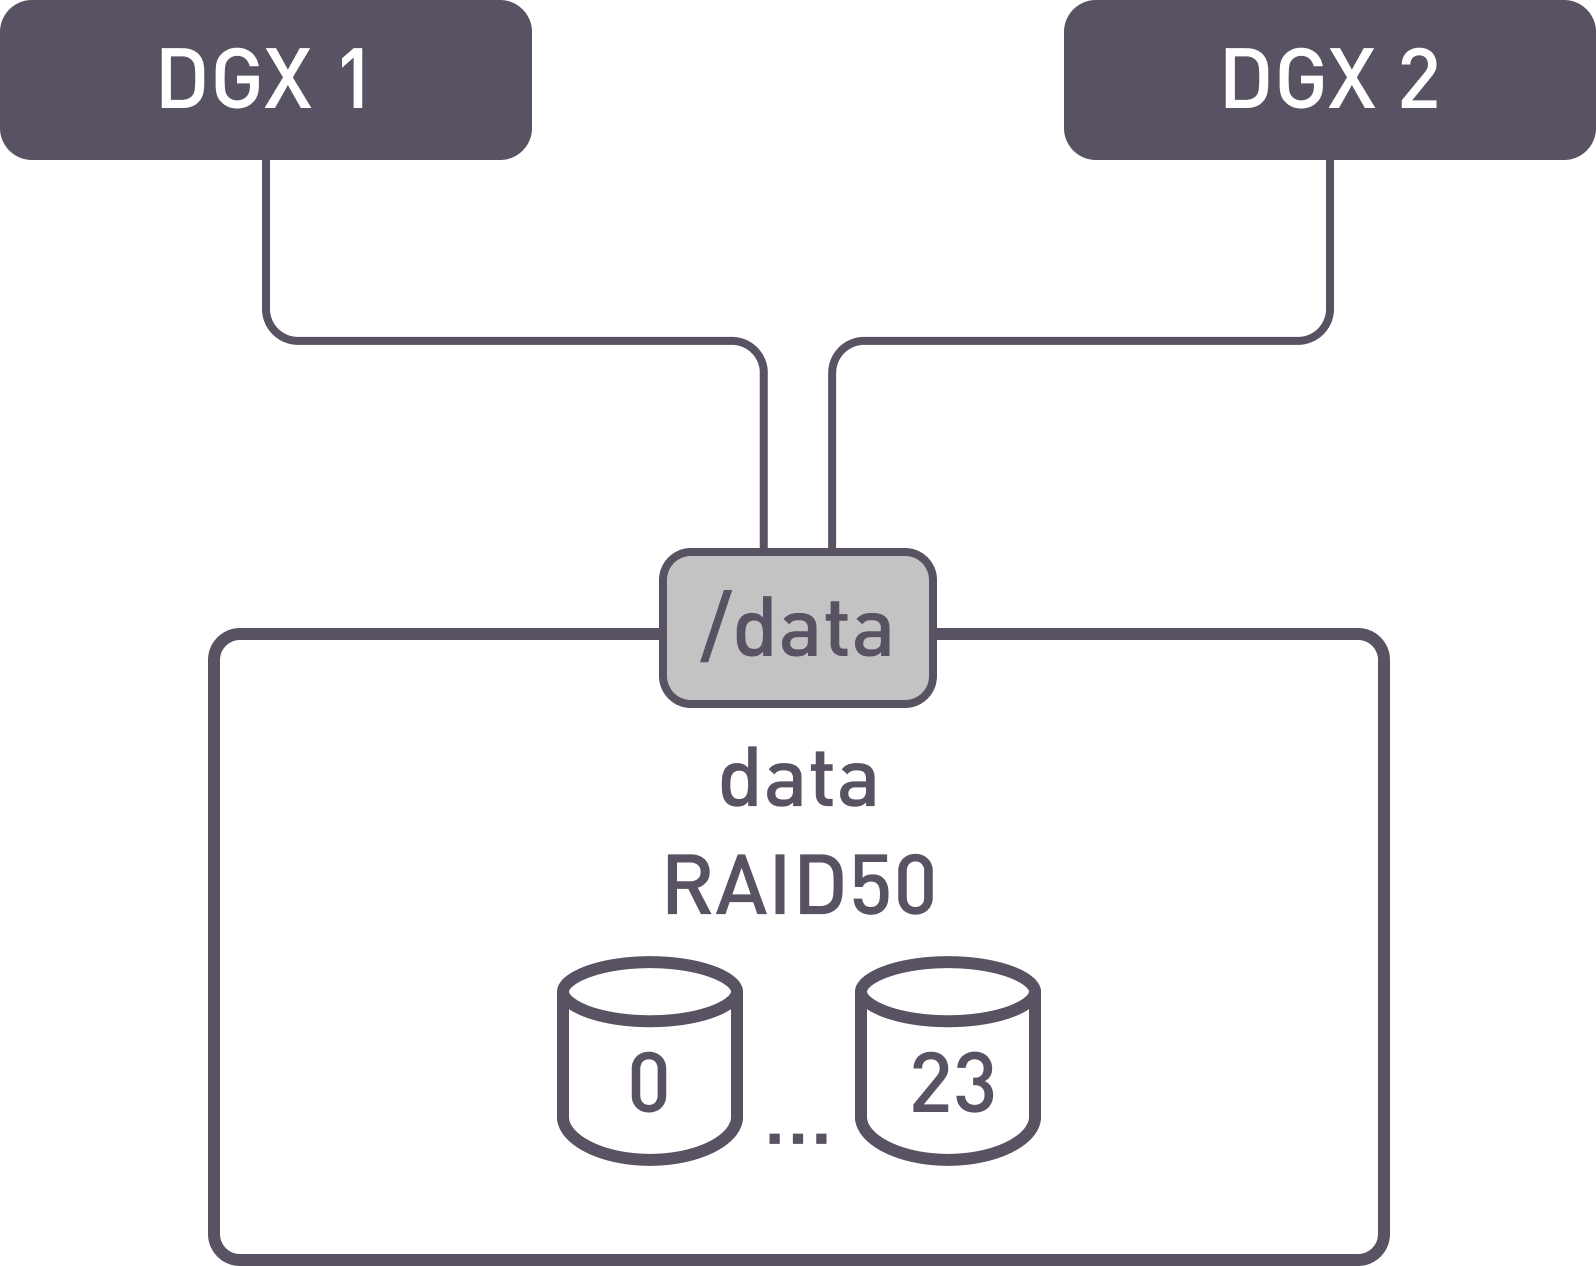
Third testing configuration
A single RAID50 or 60 is created with 24 drives. One file system with internal logs is created and exported as 1 shared folder.
Pros:
- The entire volume is allocated for data;
Cons:
- Slightly higher latency, lower performance in comparison with aligned IO.
Aligned IO Description
If the IO is not a multiple of the stripe size (for example, if the IO is 256kb and the stripe consists of 12 drives with a chunk size of 32kb), to update the checksums during writing we have to read the old data state, the old checksum state, recalculate, and write everything back.
The same situation occurs if the IO is equal to the stripe size but not aligned to its boundary and is written with an offset, then the RMW operation must be done for two stripes.
If the IO is aligned, for example if we write 256kb on an 8+1 stripe, we can generate the checksum only from the new data, and we do not need to read the old data and parity states.
Performance Tests
We conducted performance tests of the array locally to demonstrate its capabilities. Then we added the file system to assess its impact and conducted tests with clients over the network using NFSoRDMA protocols, both with one and two clients, to evaluate scalability. To understand the system's behavior in various scenarios, we presented the test results in case of failures and in asynchronous mode of NFS clients. Additionally, for comparison, we conducted tests on a single unaligned array to demonstrate the impact of such geometry on the results.
Local Performance Testing
Testing Drives and Array
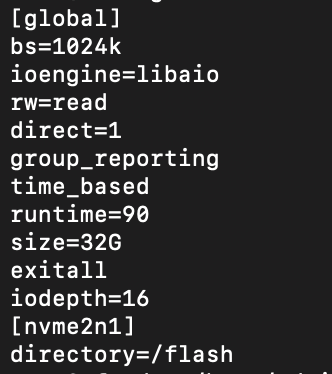
We conducted tests on the drives and array. Prior to that, we needed to initialize the array. This is the FIO configuration file:
bs=1024k
ioengine=libaio
rw=write
direct=1
group_reporting
time_based
offset_increment=3%
runtime=90
iodepth=32
group_reporting
exitall
[nvme1n1]
filename=/dev/xi_xiraid
~
~
Test results for scheme 2 (1 RAID50 of 18 drives for data and 1 RAID1 of 2 drives for logs) are as follows:
| Numjobs | 1 | 4 | 8 | 16 | 32 |
|---|---|---|---|---|---|
| Sequential write, GBps | 10 | 26.9 | 39.8 | 57.9 | 84.1 |
| Sequential read, GBps | 37.6 | 100 | 132 | 132 | 139 |
The read performance is close to the theoretical maximum for this workload.
At the same time, the write performance is very good, greatly exceeding the capabilities of alternative solutions available in the market.
Testing the Local File System
When testing the local file system, we can assess the extent of its influence on the results. FIO configuration:
bs=1024k
ioengine=libaio
rw=write
direct=1
group_reporting
time_based
runtime= 90
iodepth=32
exitall
[nvme1n1]
directory=/data
Now let's format and mount the file system:
The mount options look the following way:
| Numjobs | 1 | 4 | 8 | 16 | 32 |
|---|---|---|---|---|---|
| Sequential write, GBps | 10 | 25.9 | 39.5 | 56.8 | 74.1 |
| Sequential read, GBps | 31.6 | 99 | 107 | 109 | 109 |
Thanks to xiRAID architecture we don’t see significant impact on the results in comparison with previous test of RAID block device. As well we demonstrate that theoretically we can saturate all the network bandwidth.
Network Performance Testing
The NFS configuration file is available in Appendix 1.
The share parameters:
/data *(rw,no_root_squash,sync,
And on the client side, it's necessary to configure the client driver parameters:
options nfs max_session_slots=180
mount -o nfsvers=3,rdma,port=20049,
We recommend using NFS v3 as it demonstrates more stable results in synchronous mode. FIO configuration on the client:
Synchronous Mode, Single Client Testing
Below are the results for single client performance testing.
| Numjobs | 1 | 4 | 8 | 16 | 32 |
|---|---|---|---|---|---|
| Sequential write, GBps | 2 | 11.8 | 18.7 | 27.9 | 33.5 |
| Sequential read, GBps | 17.6 | 46.6 | 49.5 | 49.5 | 49.5 |
Write operations provide 3/4 of the network interface's capabilities, while read operations offer the full potential of the interface (50GB/s or 400Gbs). Writing is slower than the interface results because in synchronous mode, IO parallelization decreases due to the need to wait for confirmation of the write on the drives.
Synchronous Mode, Single Client Testing, Degraded Mode
It is also important to check the system's behavior in degraded mode. Degraded mode is when one or more drives are removed from the RAID.
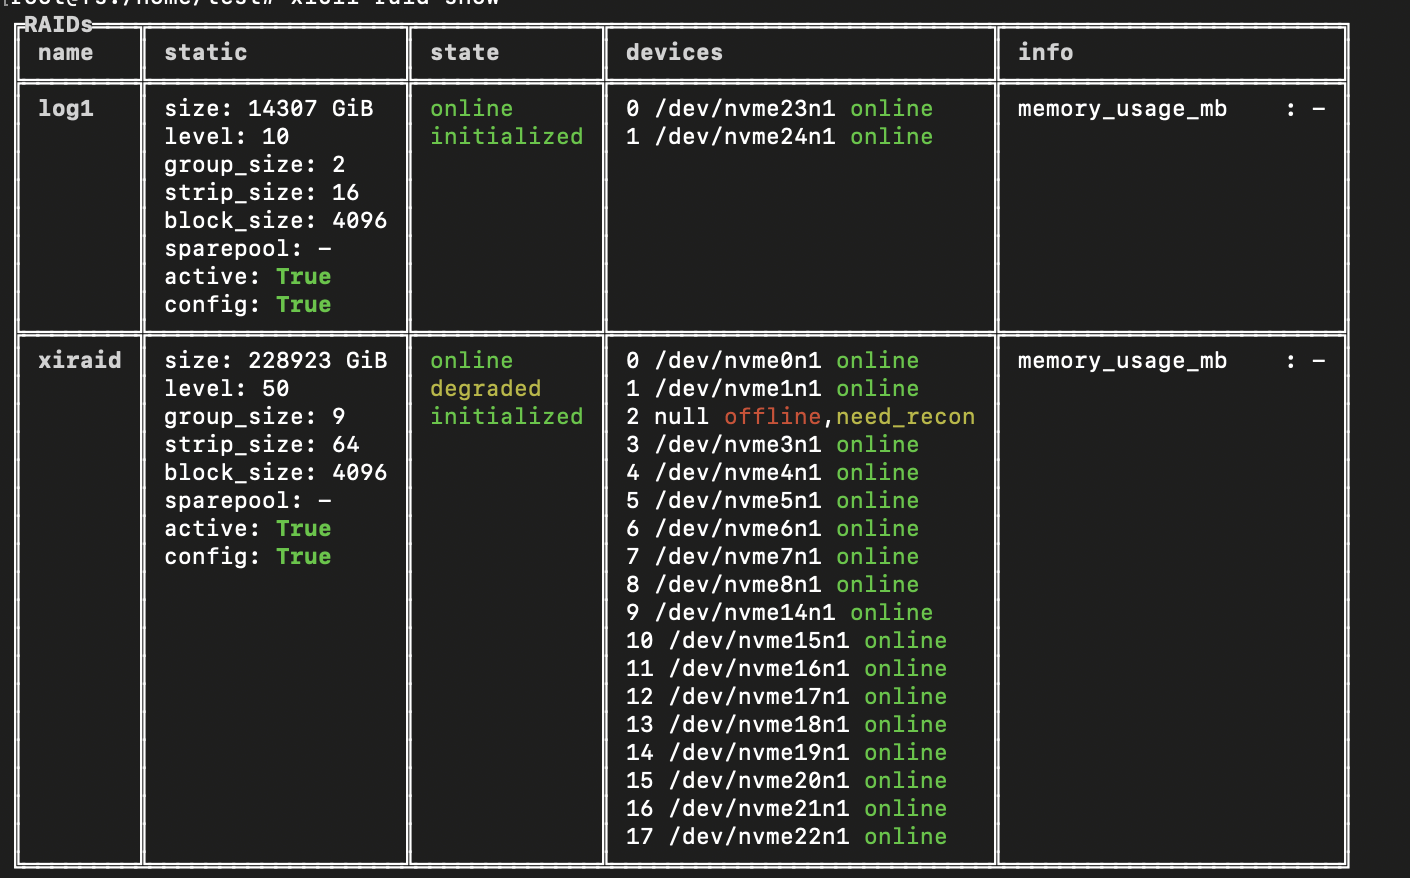
Array status in degraded mode
| Numjobs | 1 | 4 | 8 | 16 | 32 |
|---|---|---|---|---|---|
| Sequential write, GBps | 3.2 | 11.6 | 19 | 27.8 | 34.2 |
| Sequential read, GBps | 12.8 | 49.5 | 49.5 | 49.5 | 49.5 |
During one drive failure, no performance degradation is observed, meaning that DGX H100 client will not suffer any downtime.
Synchronous Mode, Two Clients Testing
| Numjobs | 1 | 4 | 8 | 16 | 32 |
|---|---|---|---|---|---|
| Sequential write, GBps | 5.3 | 14.5 | 20.3 | 26.3 | 30.2 |
| Sequential read, GBps | 20.3 | 46.2 | 49.5 | 49.5 | 49.5 |
Testing in synchronous mode demonstrates that write performance increases for low jobs count with two clients because of the increased workload from the clients, while read performance remains the same as we already reached the capabilities of a single-port 400 Gbit interface (50GB/s).
Asynchronous Mode
| Numjobs | 1 | 4 | 8 | 16 | 32 |
|---|---|---|---|---|---|
| Sequential write, GBps | 5.7 | 20.2 | 21.4 | 27.6 | 33.2 |
| Sequential read, GBps | 12.2 | 36.9 | 49.5 | 49.5 | 49.5 |
During asynchronous operations, the performance appears similar, but it might be unstable over time and for this reason we recommend running in synchronous mode whenever it is supported by the application.
Non-aligned RAID Performance Testing
In some cases, it may be necessary to increase the usable array capacity at the expense of some performance reduction, or, if the client behavior is not determined, there is no point or possibility in creating an aligned RAID.
Using all drives for testing, we will create a RAID50 array of 24 drives (scheme 3) and make some changes to the file system creation and mounting parameters (see fig. 4). We will decrease the chunk size to 32k to reduce stripe width. With this chunk size, we recommend using write intensive drives to avoid performance degradation.
| Numjobs | 1 | 4 | 8 | 16 | 32 |
|---|---|---|---|---|---|
| Sequential write, GBps | 2.7 | 10.2 | 15.8 | 23.1 | 23.1 |
| Sequential read, GBps | 8.2 | 35.7 | 49.5 | 49.5 | 49.5 |
Write performance on single client with non-aligned array is nearly one-third lower. Read operations are similar to aligned arrays.
Conclusions
1. The combination of NFSoverRDMA, xiRAID and Micron 7450 NVMe SSD enables to create a high-performance storage system capable of saturating the network bandwidth in read operation and ensuring fast flushing and checkpoint execution (write at 3/4 of the interface capability), therefore keeping DGX H100 busy with data and consequently optimizing its usage.
2. Storage performance remains unaffected in case of drive failures, eliminating the need for overprovisioning resources and avoiding system downtime.
3. Both synchronous and asynchronous operation modes are supported, and the solution offers the necessary set of settings to optimize performance for various scenarios and load patterns.
Appendix 1. NFS Configuration
NFS configuration file:
[mountd]
# debug=0
# manage-gids=y
# descriptors=0
# port=0
threads=64
# reverse-lookup=n
# state-directory-path=/var/lib/nfs
# ha-callout=
#
[nfsdcld]
# debug=0
# storagedir=/var/lib/nfs/nfsdcld
#
[nfsdcltrack]
# debug=0
# storagedir=/var/lib/nfs/nfsdcltrack
#
[nfsd]
# debug=0
threads=64
# host=
# port=0
# grace-time=90
# lease-time=90
# udp=n
# tcp=y
# vers2=n
vers3=y
vers4=y
vers4.0=y
vers4.1=y
vers4.2=y
rdma=y
rdma-port=20049
#
Appendix 2. mkfs options description
-
-d su=64k,sw=8: This option configures the data section of the filesystem.
- su=64k sets the stripe unit size to 64 kilobytes. This is a hint to the filesystem about the underlying storage's stripe unit, which can help optimize performance for RAID configurations.
- sw=8 sets the stripe width to 8 units. This represents the number of stripe units across which data is striped in a RAID array, and it's used alongside su to inform the filesystem how to optimally place data.
-
-l logdev=/dev/xi_log1,size=1G: This option configures the log section of the filesystem, which is used for journaling.
- logdev=/dev/xi_log1 specifies an external device (/dev/xi_log1) for the filesystem's log. Using a separate log device can improve performance, especially on systems with high I/O load.
- size=1G sets the size of the log to 1 gigabyte. The log size can affect the maximum transaction size and the space available for delayed logging, which can impact performance.
- /dev/xi_xiraid: This is the device or partition on which the XFS filesystem will be created.
- -f: This option forces the creation of the filesystem, even if the device already contains a filesystem or is in use. It's a precautionary flag to prevent accidental overwrites, but it should be used with care.
- -s size=4k: This sets the sector size to 4 kilobytes. The sector size is the smallest block of data that the filesystem can manage. Adjusting this setting can affect performance and space efficiency, especially with small files.
Appendix 3. xfs mount options description
- /dev/xi_xiraid: This is the device name or partition that will be mounted.
- /data: This is the mount point, i.e., the directory in the filesystem where the device will be mounted and accessed.
- xfs: This specifies the filesystem type, in this case, XFS.
-
Mount Options: The comma-separated values are options specific to how the filesystem should be mounted:
- logdev=/dev/xi_log1: Specifies an external log device for the XFS filesystem, which is used for journaling. This can improve performance by separating the log activity from the data activity.
- noatime,nodiratime: These options disable the updating of access times for files and directories when they are read. Disabling these updates can improve performance because it reduces write operations.
- logbsize=256k: Sets the size of each in-memory log buffer to 256 kilobytes. A larger log buffer can reduce the number of disk I/O operations required for logging but uses more memory.
- largeio: Hints to the filesystem that large I/O operations will be performed, which allows the filesystem to optimize its I/O patterns.
- inode64: Allows the filesystem to create inodes at any location on the disk, including above the 2TB limit on 32-bit systems. This is useful for large filesystems.
- swalloc: Allocates space in a way that is optimized for systems with a large number of disks in a stripe (software RAID, for example), potentially improving performance by spreading out allocations.
- allocsize=131072k: Sets the default allocation size for file writes to 131072 kilobytes (128MB). This can improve performance for large file writes by reducing fragmentation.
- x-systemd.requires=xiraid-restore.service: Specifies a systemd unit dependency, indicating that the xiraid-restore.service must be started before the mount can proceed.
- x-systemd.device-timeout=5m: Sets a timeout of 5 minutes for the device to become available before systemd gives up on mounting it. This is useful for devices that may take a long time to become ready.
- _netdev: This option indicates that the filesystem resides on a network device, which tells the system to wait until the network is available before attempting to mount the filesystem.
- 0 0: These are the dump and pass options, respectively. The first zero indicates that the filesystem will not be dumped (backed up) by the dump utility. The second zero indicates the order in which filesystem checks are done at boot time; a value of 0 means that the filesystem will not be checked at boot.
Appendix 4. /etc/exports options description
- /data: This specifies the directory on the NFS server that is being shared. In this case, /data is the shared directory.
- *: This wildcard character specifies that any host can access the shared directory. It means the export is not restricted to specific IP addresses or hostnames.
-
(rw,no_root_squash,sync,
insecure,no_wdelay): These are the options for the shared directory, each affecting how the directory is accessed and managed across the network:- rw: This option allows read and write access to the shared directory. Without specifying this, the default would be read-only access.
- no_root_squash: By default, NFS translates requests from the root user remotely into a non-privileged user on the server (root squash). The no_root_squash option disables this behavior, allowing the root user on a client machine to have root privileges when accessing the shared filesystem on the NFS server. This can be useful but poses a security risk as it allows the root user on a client to access files as root on the server.
- sync: Ensures that changes to the filesystem are written to disk before the command returns. The opposite is async, where NFS may respond to file requests before the data is written. While sync can decrease performance, it increases data integrity in case of a crash.
- insecure: Allows connections from clients using ports higher than 1024. By default, NFS expects to communicate over lower numbered, privileged ports which are typically below 1024. The insecure option is often required for clients that cannot bind to the privileged ports, commonly due to the client's security policy.
- no_wdelay: Disables write delays. NFS has a write delay feature that allows it to collect multiple write requests to contiguous disk blocks into one larger write request.
Appendix 5. NFS mount options on the clients
- nfsvers=3: This option specifies the version of the NFS protocol to use. nfsvers=3 indicates that NFS version 3 should be used for the connection.
- rdma: This option indicates that the Remote Direct Memory Access (RDMA) protocol should be used for data transmission. RDMA allows for high-throughput, low-latency networking, which is particularly useful in environments requiring fast access to remote storage.
- port=20049: Specifies the TCP port number on which the NFS server is listening. The default NFS port is 2049, but this option is used to connect to a server that has been configured to listen on a different port, in this case, 20049.
- sync: This option forces the NFS client to use synchronous writes. With sync, data is written to the disk before the write operation is considered complete. This can ensure data integrity but might reduce performance compared to asynchronous writes.
- nconnect=16: This is an option that allows the NFS client to establish multiple connections to the server. nconnect=16 means that up to 16 parallel connections can be used.
- 10.10.10.254:/data: This specifies the remote NFS share to be mounted. 10.10.10.254 is the IP address of the NFS server, and /data is the path to the directory on the server that is being shared.
- /data1: This is the local mount point. It's the directory on the local system where the remote NFS share will be mounted and accessed.
Download the white paper