This is the second part of our High Availability post series started with introduction into High Availability challenges some time ago. Today we will look at the practical example and see how xiRAID 4.1.0 can be configured within existing Pacemaker cluster.
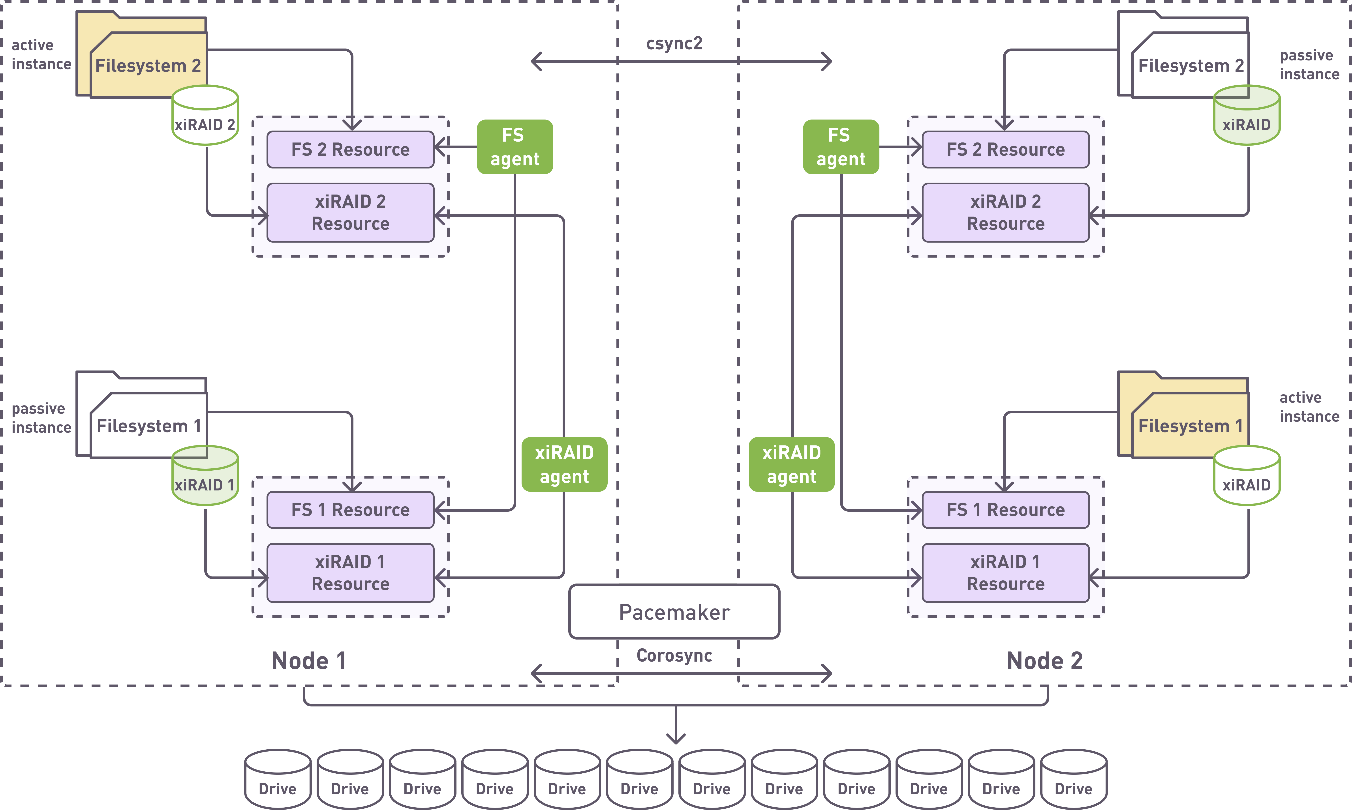
Let’s recall what we are trying to build. Below there is a scheme for the dual node cluster with shared drives configuration which we talked about in our first article:
For the sake of the article focus, we are not covering Pacemaker and xiRAID installation and just assume that we have the following:
- Two hosts with OS installed, network, and hostnames are configured.
(both nodes are listed at /etc/hosts or can be resolved by DNS). - xiRAID version 4.1 is installed according to xiRAID Classic 4.1.0 Installation Guide.
- Pacemaker version 2.1.6 or later is installed on each node following standard installation instructions. Pacemaker original documentation describes very well the configuration and operational aspects of Pacemaker but for the installation we would recommend to use guides specifically created for your target OS. For example, there are good installation documents for Oracle and CentOS.
- Pacemaker Cluster is configured with some STONITH (Shoot The Other Node In The Head). You can reference ClusterLabs article on STONITH and fencing as a starting point.
- We also need the jq package (command-line JSON processor) version 1.6 or later to be installed.
We will start with Csync2 , the utility for reliable file synchronization in a cluster. Csync2 is used to synchronize RAIDs config files between the nodes in a cluster. Typically, you can use any other file synchronization utility which can reliably copy files between the hosts but we tested our integration with it.
Csync2 is an open source software and is considered to be built and installed from the sources. Here we will go with from-the-source way, but there exist pre-built packages for some operating systems such as Ubuntu and Debian in their own repositories. We also have pre-built RPM packages in our dependency repository. Here we will show how to build and install Csync2 from sources as this is more complicated way.
First, Let’s install dependencies:
Then, get the source code:
And, finally, build and Install the utility:
# ./autogen.sh
# ./configure
# make
# make install
Repeat these steps on another node and we are good to proceed with configuring Csync2. On any one node create configuration file
with the following contents:
group csxiha {
host pcmk-nd-01;
host pcmk-nd-02;
key /usr/local/etc/csync2.key_ha;
include /etc/xiraid/raids; }
Generate a key for the first connection:
To finish copy the configuration file and generated key on the second node:
Now let’s configure the systemd unit for response side of Csync2. Put the following into /etc/systemd/system/csync2.service file:
Description=csync2 file synchronization tool using librsync and current state databases
After=network.target
[Service]
Type=idle
ExecStart=/usr/local/sbin/csync2 -ii -l
Restart=on-failure
[Install]
WantedBy=pcsd.service
systemctl start csync2.service
systemctl enable csync2.service
We have used systemd to configure the Csync2 service but if you prefer xinetd and it’s available on your system you can use it as well.
Well, by now we should have all the needed parts of our synchronization utility set up and ready to go. To verify it let’s try synchronizing files added to config:
After calling sync command, the files should be delivered to the hosts in the config. If something has not been done correctly csync2 will tell something like
With details of what’s went wrong.
Now let’s configure regular scheduled synchronization. Scheduling is no magic in our case, as we will use the classical cron utility available on every Linux system. The following command
will open cron configuration for edit and we need to add the following string to configure syncing every minute:
Now starts the real integration part specific for xiRAID. To properly do the synchronization, we need a script with exactly the following name: /etc/xiraid/config_update_handler.sh containing the simple string inside:
/usr/local/sbin/csync2 -xv
and executable:
The path and the file name are important here as this script will be called by xiRAID every time when RAID configurations will be changed.
The above must be repeated on another node as well. This concludes the part of synchronization configuration and we can proceed with RAIDs.
Now let’s get to our RAIDs. First of all, we must disable starting the raid upon the system start as in the cluster this is the responsibility of the resource manager. It is important to do this before creating any RAIDs and on both nodes.
Now, let’s create our RAIDs. We only need to do it on one of our nodes as the drives are shared and configuration will be delivered on another node by the synchronization we just set up earlier.
# xicli raid create -l 5 -ss 64 -n r5_2 -d /dev/sd{f...i}
Since we already configured config replication, after this RAID config files should be replicated on another node. This can be verified with xicli raid show which will show the new RAIDs available but offline. Also, lets create the filesystems on the newly created RAIDs.
# mkfs.ext4 /dev/xi_r5_2
Next, we need to prepare the mount points.
# mkdir -p /mnt/rd5_2
Unlike RAIDs, filesystems and their mount points must be created on each of the cluster nodes separately.
Now comes the heart of our cluster integration, the Pacemaker. A special resource agent for xiRAID Classic resource management should be available in the directory /etc/xraid/agents on the system after installing the xiraid-release package.
The Pacemaker though, by default expects the resource agents to be found under /usr/lib/ocf/resource.d. So, on both nodes, we should create a proper directory and make a symlinks from there to our agent.
# ln -s /etc/xraid/agents/raid /usr/lib/ocf/resource.d/xraid/raid
Next, let’s create a Cluster Information Base (CIB) copy to make changes in it and upload new configuration in a batch:
Every RAID has it’s own unique UUID which can be seen in the output of with xicli raid show command. Let’s pick UUIDs for the RAIDs we created earlier and save them into environment variables:
# RAID_UUID_2=$(xicli raid show -f json | jq -r .r5_2.uuid)
By this point we prepared everything to start creating Pacemaker cluster resources. Let’s do it for our RAIDs using UUIDs in environment variables from the previous step (notice that each resource is assigned to its group):
# pcs -f fs_cfg resource create xi_r5_1 ocf:xraid:raid \
	name=r5_1 uuid=$RAID_UUID_1 \
	op monitor interval=5s \
	meta migration-threshold=1 \
	--group=gr_r5_1
# pcs -f fs_cfg resource create xi_r5_2 ocf:xraid:raid \
	name=r5_2 uuid=$RAID_UUID_2 \
	op monitor interval=5s \
	meta migration-threshold=1 \
	--group=gr_r5_2
and also, for the filesystems (notice that we assign them to the same groups with the RAID they have been created on):
# pcs -f fs_cfg resource create fs_r5_1 Filesystem \
	device="/dev/xi_r5_1" directory="/mnt/rd5_1" \
	fstype="ext4" \
	--group=gr_r5_1
# pcs -f fs_cfg resource create fs_r5_2 Filesystem \
	device="/dev/xi_r5_1" directory="/mnt/rd5_1" \
	fstype="ext4" \
	--group=gr_r5_2
In order to run two resource sets on two different nodes let’s define the resource location preferences:
# pcs -f fs_cfg constraint location gr_r5_2 prefers pcmk-nd-02=50
To avoid any surprises let’s unload RAIDs before our newly configured CIB file gets uploaded and applied to the cluster configuration:
# xicli raid unload -n r5_2
Finally, let’s upload CIB configuration from file to cluster configuration:
Let’s verify how our cluster configuration worked with the use of pcs status command:
# pcs status
Cluster name: testcluster
Cluster Summary:
  * Stack: corosync (Pacemaker is running)
  * Current DC: pcmk-nd-01 (version 2.1.6-10.1.el9_3-6fdc9deea29) - partition with quorum
  * Last updated: Mon Apr  8 01:43:08 2024 on pcmk-nd-01
  * Last change:  Mon Apr  8 01:40:35 2024 by root via cibadmin on pcmk-nd-01
  * 2 nodes configured
  * 5 resource instances configured
Node List:
  * Online: [ pcmk-nd-01 pcmk-nd-02 ]
Full List of Resources:
  * sbd_fencing   (stonith:fence_sbd):    Started pcmk-nd-01
  * Resource Group: gr_r5_1:
	* xi_r5_1     (ocf:xraid:raid):       Started pcmk-nd-01
	* fs_r5_1     (ocf:heartbeat:Filesystem):      Started pcmk-nd-01
  * Resource Group: gr_r5_2:
	* xi_r5_2    (ocf:xraid:raid):        Started pcmk-nd-02
	* fs_r5_2    (ocf:heartbeat:Filesystem):      Started pcmk-nd-02
Daemon Status:
  corosync: active/disabled
  pacemaker: active/disabled
  pcsd: active/enabled
  sbd: active/enabled
Now we have a fully set up Pacemaker cluster with RAID and filesystem resources linked together and managed dynamically. If one node of the cluster fails, Pacemaker will start resources on another. At the same time if only a particular drive fails, xiRAID will take care of it going into degraded mode on the node where it is active and failover will happen.
To test it out one can try to shut one of the nodes down, wait a minute and with the same command above observe that the group of resources that used to be run on the shut node now is running on the node that remains online.
# pcs status
Cluster name: testcluster
Cluster Summary:
  * Stack: corosync (Pacemaker is running)
  * Current DC: pcmk-nd-01 (version 2.1.6-10.1.el9_3-6fdc9deea29) - partition with quorum
  * Last updated: Mon Apr  8 01:43:08 2024 on pcmk-nd-01
  * Last change:  Mon Apr  8 01:40:35 2024 by root via cibadmin on pcmk-nd-01
  * 2 nodes configured
  * 5 resource instances configured
Node List:
  * Online: [pcmk-nd-01]
  * Offline: [pcmk-nd-02]
Full List of Resources:
  * sbd_fencing   (stonith:fence_sbd):    Started pcmk-nd-01
  * Resource Group: gr_r5_1:
	* xi_r5_1     (ocf:xraid:raid):       Started pcmk-nd-01
	* fs_r5_1     (ocf:heartbeat:Filesystem):      Started pcmk-nd-01
  * Resource Group: gr_r5_2:
	* xi_r5_2    (ocf:xraid:raid):        Started pcmk-nd-01
	* fs_r5_2    (ocf:heartbeat:Filesystem):      Started pcmk-nd-01
Daemon Status:
  corosync: active/disabled
  pacemaker: active/disabled
  pcsd: active/enabled
  sbd: active/enabled
We hope this walkthrough article was helpful will help you in your High Availability experiments with xiRAID.