Just like when the NVMe protocol first appeared on the scene, the advent of server platforms and storage devices supporting the PCI-E Gen5 interface has brought forth a new layer of complexity and challenge. Storage capabilities have grown at such a rate that it becomes extremely hard to attain the anticipated performance levels when multiple devices are under load—especially when these devices are joined in arrays.
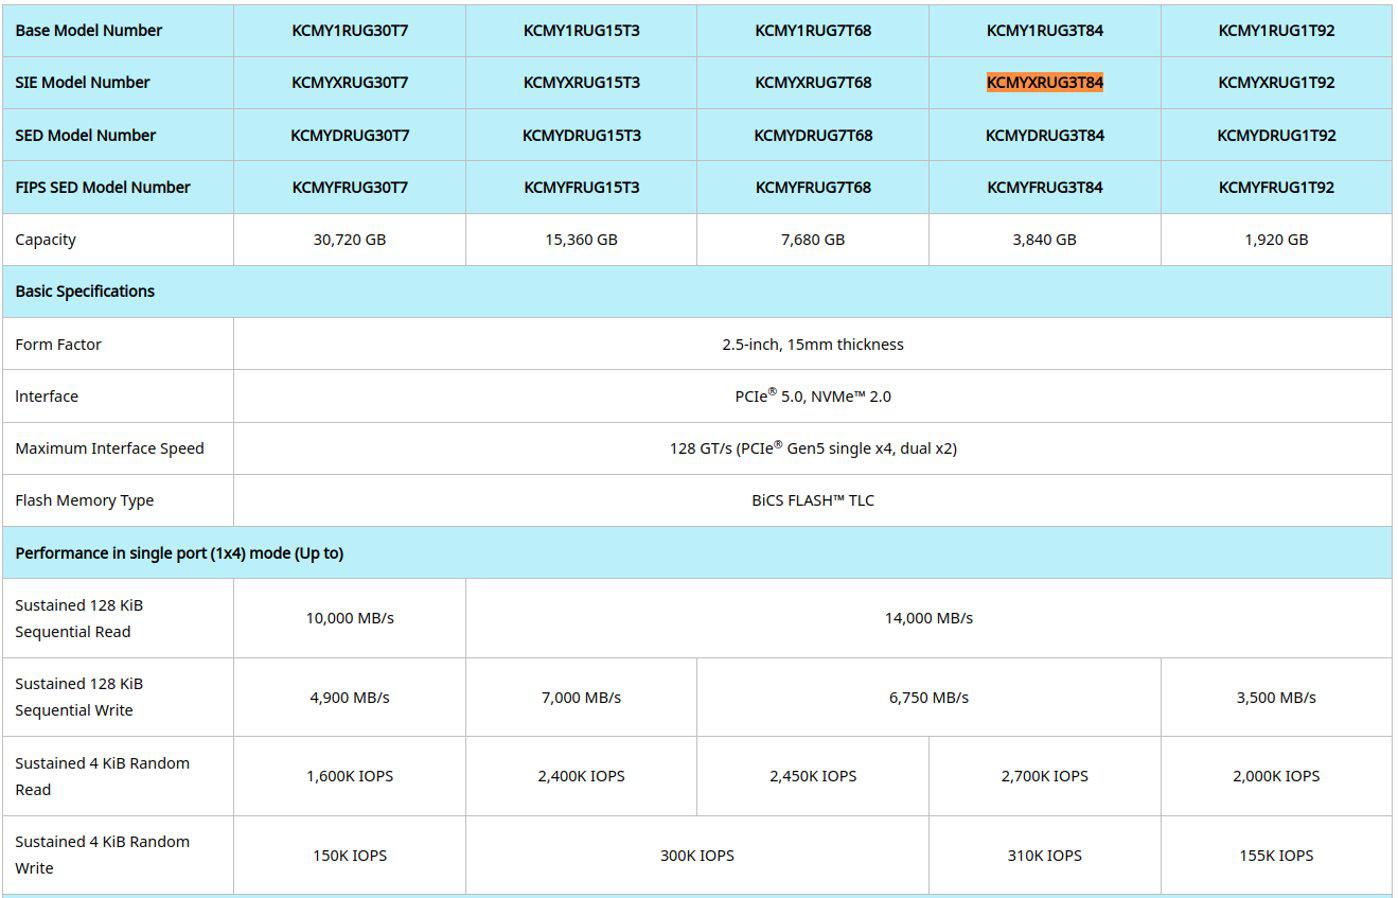
For the everyday professional, one or two storage devices may suffice, boasting impressive specs of 2.7M IOps and 14GBps. However, for enterprises and cloud service providers that might employ servers using 8, 12, 16, or even 24 storage devices, there's a looming risk that their storage subsystem won't outperform the previous generation's hardware.
So, how can one prevent this performance pitfall? The key lies in meticulously setting up the server and software, as well as utilizing the hardware capabilities effectively. Let's unravel this mystery based on our firsthand experience.
Test Environment
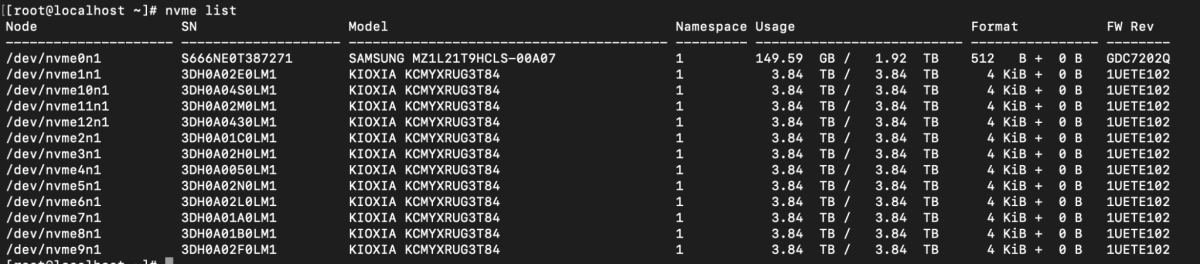
Our server platform is provided by Ingrasys, accompanied by 12 storage devices from KIOXIA.
Device Specifications:
CPU: Dual Intel(R) Xeon(R) Gold 6430
Memory: 2TB (DDR5 4800 64GBx32)
OS: Oracle Linux 8.8 (kernel 4.18.0-477)
System Topology:
[root@localhost ~]# lstopo-no-graphics
Machine (2016GB total)
  Package L#0
    NUMANode L#0 (P#0 1008GB)
    L3 L#0 (60MB)
      L2 L#0 (2048KB) + L1d L#0 (48KB) + L1i L#0 (32KB) + Core L#0
        PU L#0 (P#0)
        PU L#1 (P#64)
      L2 L#1 (2048KB) + L1d L#1 (48KB) + L1i L#1 (32KB) + Core L#1
        PU L#2 (P#1)
        PU L#3 (P#65)
      L2 L#2 (2048KB) + L1d L#2 (48KB) + L1i L#2 (32KB) + Core L#2
        PU L#4 (P#2)
        PU L#5 (P#66)
      L2 L#3 (2048KB) + L1d L#3 (48KB) + L1i L#3 (32KB) + Core L#3
        PU L#6 (P#3)
        PU L#7 (P#67)
      L2 L#4 (2048KB) + L1d L#4 (48KB) + L1i L#4 (32KB) + Core L#4
        PU L#8 (P#4)
        PU L#9 (P#68)
      L2 L#5 (2048KB) + L1d L#5 (48KB) + L1i L#5 (32KB) + Core L#5
        PU L#10 (P#5)
        PU L#11 (P#69)
      L2 L#6 (2048KB) + L1d L#6 (48KB) + L1i L#6 (32KB) + Core L#6
        PU L#12 (P#6)
        PU L#13 (P#70)
      L2 L#7 (2048KB) + L1d L#7 (48KB) + L1i L#7 (32KB) + Core L#7
        PU L#14 (P#7)
        PU L#15 (P#71)
      L2 L#8 (2048KB) + L1d L#8 (48KB) + L1i L#8 (32KB) + Core L#8
        PU L#16 (P#8)
        PU L#17 (P#72)
      L2 L#9 (2048KB) + L1d L#9 (48KB) + L1i L#9 (32KB) + Core L#9
        PU L#18 (P#9)
        PU L#19 (P#73)
      L2 L#10 (2048KB) + L1d L#10 (48KB) + L1i L#10 (32KB) + Core L#10
        PU L#20 (P#10)
        PU L#21 (P#74)
      L2 L#11 (2048KB) + L1d L#11 (48KB) + L1i L#11 (32KB) + Core L#11
        PU L#22 (P#11)
        PU L#23 (P#75)
      L2 L#12 (2048KB) + L1d L#12 (48KB) + L1i L#12 (32KB) + Core L#12
        PU L#24 (P#12)
        PU L#25 (P#76)
      L2 L#13 (2048KB) + L1d L#13 (48KB) + L1i L#13 (32KB) + Core L#13
        PU L#26 (P#13)
        PU L#27 (P#77)
      L2 L#14 (2048KB) + L1d L#14 (48KB) + L1i L#14 (32KB) + Core L#14
        PU L#28 (P#14)
        PU L#29 (P#78)
      L2 L#15 (2048KB) + L1d L#15 (48KB) + L1i L#15 (32KB) + Core L#15
        PU L#30 (P#15)
        PU L#31 (P#79)
      L2 L#16 (2048KB) + L1d L#16 (48KB) + L1i L#16 (32KB) + Core L#16
        PU L#32 (P#16)
        PU L#33 (P#80)
      L2 L#17 (2048KB) + L1d L#17 (48KB) + L1i L#17 (32KB) + Core L#17
        PU L#34 (P#17)
        PU L#35 (P#81)
      L2 L#18 (2048KB) + L1d L#18 (48KB) + L1i L#18 (32KB) + Core L#18
        PU L#36 (P#18)
        PU L#37 (P#82)
      L2 L#19 (2048KB) + L1d L#19 (48KB) + L1i L#19 (32KB) + Core L#19
        PU L#38 (P#19)
        PU L#39 (P#83)
      L2 L#20 (2048KB) + L1d L#20 (48KB) + L1i L#20 (32KB) + Core L#20
        PU L#40 (P#20)
        PU L#41 (P#84)
      L2 L#21 (2048KB) + L1d L#21 (48KB) + L1i L#21 (32KB) + Core L#21
        PU L#42 (P#21)
        PU L#43 (P#85)
      L2 L#22 (2048KB) + L1d L#22 (48KB) + L1i L#22 (32KB) + Core L#22
        PU L#44 (P#22)
        PU L#45 (P#86)
      L2 L#23 (2048KB) + L1d L#23 (48KB) + L1i L#23 (32KB) + Core L#23
        PU L#46 (P#23)
        PU L#47 (P#87)
      L2 L#24 (2048KB) + L1d L#24 (48KB) + L1i L#24 (32KB) + Core L#24
        PU L#48 (P#24)
        PU L#49 (P#88)
      L2 L#25 (2048KB) + L1d L#25 (48KB) + L1i L#25 (32KB) + Core L#25
        PU L#50 (P#25)
        PU L#51 (P#89)
      L2 L#26 (2048KB) + L1d L#26 (48KB) + L1i L#26 (32KB) + Core L#26
        PU L#52 (P#26)
        PU L#53 (P#90)
      L2 L#27 (2048KB) + L1d L#27 (48KB) + L1i L#27 (32KB) + Core L#27
        PU L#54 (P#27)
        PU L#55 (P#91)
      L2 L#28 (2048KB) + L1d L#28 (48KB) + L1i L#28 (32KB) + Core L#28
        PU L#56 (P#28)
        PU L#57 (P#92)
      L2 L#29 (2048KB) + L1d L#29 (48KB) + L1i L#29 (32KB) + Core L#29
        PU L#58 (P#29)
        PU L#59 (P#93)
      L2 L#30 (2048KB) + L1d L#30 (48KB) + L1i L#30 (32KB) + Core L#30
        PU L#60 (P#30)
        PU L#61 (P#94)
      L2 L#31 (2048KB) + L1d L#31 (48KB) + L1i L#31 (32KB) + Core L#31
        PU L#62 (P#31)
        PU L#63 (P#95)
    HostBridge
      PCIBridge
        PCI 01:00.0 (NVMExp)
          Block(Disk) "nvme0n1"
      PCIBridge
        PCIBridge
          PCI 03:00.0 (VGA)
    HostBridge
      PCIBridge
        PCI 49:00.0 (NVMExp)
          Block(Disk) "nvme1c1n1"
      PCIBridge
        PCI 4a:00.0 (NVMExp)
          Block(Disk) "nvme2c2n1"
      PCIBridge
        PCI 4b:00.0 (NVMExp)
          Block(Disk) "nvme3c3n1"
      PCIBridge
        PCI 4c:00.0 (NVMExp)
          Block(Disk) "nvme4c4n1"
    HostBridge
      PCIBridge
        PCI 5a:00.0 (NVMExp)
          Block(Disk) "nvme5c5n1"
      PCIBridge
        PCI 5b:00.0 (NVMExp)
          Block(Disk) "nvme6c6n1"
  Package L#1
    NUMANode L#1 (P#1 1008GB)
    L3 L#1 (60MB)
      L2 L#32 (2048KB) + L1d L#32 (48KB) + L1i L#32 (32KB) + Core L#32
        PU L#64 (P#32)
        PU L#65 (P#96)
      L2 L#33 (2048KB) + L1d L#33 (48KB) + L1i L#33 (32KB) + Core L#33
        PU L#66 (P#33)
        PU L#67 (P#97)
      L2 L#34 (2048KB) + L1d L#34 (48KB) + L1i L#34 (32KB) + Core L#34
        PU L#68 (P#34)
        PU L#69 (P#98)
      L2 L#35 (2048KB) + L1d L#35 (48KB) + L1i L#35 (32KB) + Core L#35
        PU L#70 (P#35)
        PU L#71 (P#99)
      L2 L#36 (2048KB) + L1d L#36 (48KB) + L1i L#36 (32KB) + Core L#36
        PU L#72 (P#36)
        PU L#73 (P#100)
      L2 L#37 (2048KB) + L1d L#37 (48KB) + L1i L#37 (32KB) + Core L#37
        PU L#74 (P#37)
        PU L#75 (P#101)
      L2 L#38 (2048KB) + L1d L#38 (48KB) + L1i L#38 (32KB) + Core L#38
        PU L#76 (P#38)
        PU L#77 (P#102)
      L2 L#39 (2048KB) + L1d L#39 (48KB) + L1i L#39 (32KB) + Core L#39
        PU L#78 (P#39)
        PU L#79 (P#103)
      L2 L#40 (2048KB) + L1d L#40 (48KB) + L1i L#40 (32KB) + Core L#40
        PU L#80 (P#40)
        PU L#81 (P#104)
      L2 L#41 (2048KB) + L1d L#41 (48KB) + L1i L#41 (32KB) + Core L#41
        PU L#82 (P#41)
        PU L#83 (P#105)
      L2 L#42 (2048KB) + L1d L#42 (48KB) + L1i L#42 (32KB) + Core L#42
        PU L#84 (P#42)
        PU L#85 (P#106)
      L2 L#43 (2048KB) + L1d L#43 (48KB) + L1i L#43 (32KB) + Core L#43
        PU L#86 (P#43)
        PU L#87 (P#107)
      L2 L#44 (2048KB) + L1d L#44 (48KB) + L1i L#44 (32KB) + Core L#44
        PU L#88 (P#44)
        PU L#89 (P#108)
      L2 L#45 (2048KB) + L1d L#45 (48KB) + L1i L#45 (32KB) + Core L#45
        PU L#90 (P#45)
        PU L#91 (P#109)
      L2 L#46 (2048KB) + L1d L#46 (48KB) + L1i L#46 (32KB) + Core L#46
        PU L#92 (P#46)
        PU L#93 (P#110)
      L2 L#47 (2048KB) + L1d L#47 (48KB) + L1i L#47 (32KB) + Core L#47
        PU L#94 (P#47)
        PU L#95 (P#111)
      L2 L#48 (2048KB) + L1d L#48 (48KB) + L1i L#48 (32KB) + Core L#48
        PU L#96 (P#48)
        PU L#97 (P#112)
      L2 L#49 (2048KB) + L1d L#49 (48KB) + L1i L#49 (32KB) + Core L#49
        PU L#98 (P#49)
        PU L#99 (P#113)
      L2 L#50 (2048KB) + L1d L#50 (48KB) + L1i L#50 (32KB) + Core L#50
        PU L#100 (P#50)
        PU L#101 (P#114)
      L2 L#51 (2048KB) + L1d L#51 (48KB) + L1i L#51 (32KB) + Core L#51
        PU L#102 (P#51)
        PU L#103 (P#115)
      L2 L#52 (2048KB) + L1d L#52 (48KB) + L1i L#52 (32KB) + Core L#52
        PU L#104 (P#52)
        PU L#105 (P#116)
      L2 L#53 (2048KB) + L1d L#53 (48KB) + L1i L#53 (32KB) + Core L#53
        PU L#106 (P#53)
        PU L#107 (P#117)
      L2 L#54 (2048KB) + L1d L#54 (48KB) + L1i L#54 (32KB) + Core L#54
        PU L#108 (P#54)
        PU L#109 (P#118)
      L2 L#55 (2048KB) + L1d L#55 (48KB) + L1i L#55 (32KB) + Core L#55
        PU L#110 (P#55)
        PU L#111 (P#119)
      L2 L#56 (2048KB) + L1d L#56 (48KB) + L1i L#56 (32KB) + Core L#56
        PU L#112 (P#56)
        PU L#113 (P#120)
      L2 L#57 (2048KB) + L1d L#57 (48KB) + L1i L#57 (32KB) + Core L#57
        PU L#114 (P#57)
        PU L#115 (P#121)
      L2 L#58 (2048KB) + L1d L#58 (48KB) + L1i L#58 (32KB) + Core L#58
        PU L#116 (P#58)
        PU L#117 (P#122)
      L2 L#59 (2048KB) + L1d L#59 (48KB) + L1i L#59 (32KB) + Core L#59
        PU L#118 (P#59)
        PU L#119 (P#123)
      L2 L#60 (2048KB) + L1d L#60 (48KB) + L1i L#60 (32KB) + Core L#60
        PU L#120 (P#60)
        PU L#121 (P#124)
      L2 L#61 (2048KB) + L1d L#61 (48KB) + L1i L#61 (32KB) + Core L#61
        PU L#122 (P#61)
        PU L#123 (P#125)
      L2 L#62 (2048KB) + L1d L#62 (48KB) + L1i L#62 (32KB) + Core L#62
        PU L#124 (P#62)
        PU L#125 (P#126)
      L2 L#63 (2048KB) + L1d L#63 (48KB) + L1i L#63 (32KB) + Core L#63
        PU L#126 (P#63)
        PU L#127 (P#127)
    HostBridge
      PCIBridge
        PCI c8:00.0 (NVMExp)
          Block(Disk) "nvme7c7n1"
      PCIBridge
        PCI c9:00.0 (NVMExp)
          Block(Disk) "nvme8c8n1"
    HostBridge
      PCIBridge
        PCI d8:00.0 (NVMExp)
          Block(Disk) "nvme9c9n1"
      PCIBridge
        PCI d9:00.0 (NVMExp)
          Block(Disk) "nvme10c10n1"
      PCIBridge
        PCI da:00.0 (NVMExp)
          Block(Disk) "nvme11c11n1"
      PCIBridge
        PCI db:00.0 (NVMExp)
          Block(Disk) "nvme12c12n1"
Initial Performance - 10M IOps
Upon firing up our storage array, we encountered a surprising issue: we couldn't surpass 10M IOps. While this is faster than most hardware arrays on the market, it fell short of our expectations.
Before running any tests, we had made sure to apply all recommended system settings. A performance measurement of a single storage device showed that it was performing decently on its own.
Test 1. Scaling with a Bash Script
In order to find what was limiting the performance we decided to test the system's ability to scale its performance with the addition of more storage devices. For that purpose, we’ve chosen a customized Bash script designed to maximize our storage system capabilities. Here's the script we used:
#!/bin/bash
# Define a template for the global parameters
GLOBAL_PARAMS="
[global]
direct=1               # Bypass the page cache for I/O
bs=4k                  # Block size
ioengine=libaio        # I/O engine to use (libaio is Linux-native AIO)
numjobs=4              # Number of threads/jobs to spawn
iodepth=128            # Number of I/O operations to keep in flight against the file
rw=randread            # Random read
rwmixread=100          # Percentage of the mix that should be reads
norandommap=1          # Don't pre-generate a random map
gtod_reduce=1          # Reduce the gettimeofday() system calls
group_reporting        # Reports results as a group rather than individually
randrepeat=0           # Disable repeating the random number seed
runtime=120            # Duration of the test in seconds
exitall=1              # fio terminates all jobs in the same group, as soon as one job of that group finishes
"
# Define the individual drive configurations
DRIVE_PARAMS="
[file%d]
filename=/dev/nvme%dn1            # Path to the NVMe device
numa_cpu_nodes=%d                 # NUMA CPU nodes
numa_mem_policy=bind:%d           # NUMA memory policy
"
# Create a temp directory for configs
mkdir -p ./temp_configs
# Loop to create configuration for each number of drives
for i in {1..12}; do
    # Create config file
    CONFIG_FILE="./temp_configs/config_$i.fio"
    echo "$GLOBAL_PARAMS" > "$CONFIG_FILE"
    # Append the required drive configurations
    for j in {1..12}; do
        if [ $j -le 6 ]; then
            printf "$DRIVE_PARAMS" $j $j 0 0 >> "$CONFIG_FILE"
        else
            printf "$DRIVE_PARAMS" $j $j 1 1 >> "$CONFIG_FILE"
        fi
        # If we've added the required number of drives, break the loop
        if [ $j -eq $i ]; then
            break
        fi
    done
done
# Now run fio for each configuration and collect results
for i in {1..12}; do
    CONFIG_FILE="./temp_configs/config_$i.fio"
    OUTPUT_FILE="result_$i.json"
    fio "$CONFIG_FILE" --output-format=json --output="$OUTPUT_FILE"
done
# Cleanup
rm -r ./temp_configs
This Bash script performs storage performance tests using the fio benchmarking tool. The script tests multiple drives with varying configurations and then generates performance metrics. Here's a breakdown of the script's components:
- Global Parameters: First, a set of global parameters is defined for the fio test. These are constants across all test runs and includes settings like block size (bs), I/O engine (ioengine), number of threads (numjobs), and so on.
- Drive-Specific Parameters: Next, a template for the drive-specific parameters is defined. This includes the path to the NVMe device (filename) and NUMA (Non-Uniform Memory Access) configurations (numa_cpu_nodes and numa_mem_policy).
- Temporary Configurations: The script then creates a temporary directory to hold the fio configuration files that will be generated for each test.
- Configuration Generation: Loop through numbers from 1 to 12, generating a configuration file for each number.
- Benchmarking: Each generated configuration file is used to run the fio test. The results are saved in JSON format.
- Cleanup: Finally, the script removes the temporary directory containing the configuration files.
The script loops through numbers 1 to 12, creating a fio configuration file for each number. For each configuration, the number of drives specified (from 1 to 12) is appended to the configuration file. As evident from the script, we took into account the placement of storage devices on Numa Nodes.
Scaling Test Results

When we pushed the system with 12 storage devices, the performance dipped to less than half of what was anticipated.
Being concerned by this fact, we tried updating the OS kernel and even switched to a different Linux distribution. Despite these adjustments, our system's performance remained the same. But what could be the hidden bottleneck? Was there an internal flaw in our system?
Test 2. io_uring, an Interface for Asynchronous I/O Operations
When searching for a way to overcome the performance limit we decided to test the io_uring interface.
The story would be incomplete without a brief summary on io_uring—a promising star in the world of Linux I/O. Introduced in Linux 5.1, io_uring promised to revolutionize the way asynchronous I/O operations were handled. Unlike older interfaces, it allows both submission and completion of I/O to be done without any system calls, aiming to reduce the overhead and increase performance.
What makes io_uring different? In traditional setups like libaio, each I/O operation would require a system call. When you're scaling up to millions of I/O operations per second, these system calls can be a burden. io_uring optimizes this by allowing batch processing of I/O requests and completions, meaning you can handle multiple tasks in one go.
First, we enabled NVMe polling support in the kernel:
dracut -f
reboot
Adapting the Script for io_uring
Our new script employed io_uring, a modern, flexible approach to I/O that promised high performance. Here's the adapted script:
#!/bin/bash

# Define a template for the global parameters
GLOBAL_PARAMS="
[global]
direct=1               # Bypass the page cache for I/O
bs=4k                  # Block size
ioengine=io_uring      # I/O engine to use (libaio is Linux-native AIO)
fixedbufs=1            # If fio is asked to do direct IO, then Linux will map pages for each  IO  call,  and release  them  when  IO  is  done.  If this option is set, the pages are pre-mapped before IO is started.
registerfiles=1        # With  this option, fio registers the set of files being used with the kernel.
sqthread_poll=1        # This option is specific to the io_uring engine in Linux. It tells fio to offload the completion events polling work to a dedicated kernel thread. This can sometimes improve performance when using io_uring by offloading some of the completion processing from the application to the kernel, but the actual impact is highly dependent on the specific workload and system configuration.
numjobs=4              # Number of threads/jobs to spawn
iodepth=128            # Number of I/O operations to keep in flight against the file
rw=randread            # Random read
rwmixread=100          # Percentage of the mix that should be reads
norandommap=1          # Don't pre-generate a random map
gtod_reduce=1          # Reduce the gettimeofday() system calls
group_reporting        # Reports results as a group rather than individually
randrepeat=0           # Disable repeating the random number seed
runtime=120            # Duration of the test in seconds
exitall=1              # fio terminates all jobs in the same group, as soon as one job of that group finishes
"

# Define the individual drive configurations
DRIVE_PARAMS="
[file%d]
filename=/dev/nvme%dn1            # Path to the NVMe device
numa_cpu_nodes=%d                 # NUMA CPU nodes
numa_mem_policy=bind:%d           # NUMA memory policy
"

# Create a temp directory for configs
mkdir -p ./temp_configs

# Loop to create configuration for each number of drives
for i in {1..12}; do
    # Create config file
    CONFIG_FILE="./temp_configs/config_$i.fio"
    echo "$GLOBAL_PARAMS" > "$CONFIG_FILE"

    # Append the required drive configurations
    for j in {1..12}; do
        if [ $j -le 6 ]; then
            printf "$DRIVE_PARAMS" $j $j 0 0 >> "$CONFIG_FILE"
        else
            printf "$DRIVE_PARAMS" $j $j 1 1 >> "$CONFIG_FILE"
        fi

        # If we've added the required number of drives, break the loop
        if [ $j -eq $i ]; then
            break
        fi
    done
done

# Now run fio for each configuration and collect results
for i in {1..12}; do
    CONFIG_FILE="./temp_configs/config_$i.fio"
    OUTPUT_FILE="result_$i.json"
    fio "$CONFIG_FILE" --output-format=json --output="$OUTPUT_FILE"
done

# Cleanup
rm -r ./temp_configs
The second script is very similar to the first, but there are key differences that mainly center around the global parameters set for the fio tool and the choice of the I/O engine.
- I/O Engine: While the first script uses the libaio I/O engine, which is Linux-native asynchronous I/O, the second script opts for io_uring. This is a more modern alternative, potentially offering better performance and features, especially for asynchronous I/O operations.
-
Additional Flags Specific to io_uring:
fixedbufs=1: This pre-maps the pages before I/O is started when doing direct I/O.
registerfiles=1: This registers the set of files being used with the kernel, often to improve performance.
sqthread_poll=1: Offloads the completion events polling work to a dedicated kernel thread, which can sometimes improve performance when using io_uring.
io_uring Test Results
Unfortunately, the performance with a large number of storage devices actually dropped. This was a setback, a plot twist we hadn't anticipated.
The storage array performance still refused to meet our expectations.

Test 3. NVMe Polled Mode
Just when we thought we were close to a solution, the system throws us a curveball. After setting the hipri=1 option to utilize NVMe's polled I/O mode—a feature designed to minimize I/O completion latency—we hit an unexpected error. Our fio tests were met with a chorus of "Operation not supported" errors.
[root@localhost ~]# ./1by1P.sh
fio: io_u error on file /dev/nvme1n1: Operation not supported: read offset=1418861584384, buflen=4096
fio: io_u error on file /dev/nvme2n1: Operation not supported: read offset=1745590550528, buflen=4096
fio: io_u error on file /dev/nvme1n1: Operation not supported: read offset=1673213235200, buflen=4096
fio: io_u error on file /dev/nvme1n1: Operation not supported: read offset=3748255338496, buflen=4096
fio: io_u error on file /dev/nvme1n1: Operation not supported: read offset=1693115449344, buflen=4096
fio: io_u error on file /dev/nvme2n1: Operation not supported: read offset=1447897796608, buflen=4096
fio: io_u error on file /dev/nvme2n1: Operation not supported: read offset=3410984124416, buflen=4096
fio: io_u error on file /dev/nvme1n1: Operation not supported: read offset=2221954170880, buflen=4096
fio: io_u error on file /dev/nvme2n1: Operation not supported: read offset=1929571205120, buflen=4096
fio: io_u error on file /dev/nvme2n1: Operation not supported: read offset=3158551310336, buflen=4096
fio: io_u error on file /dev/nvme2n1: Operation not supported: read offset=210416812032, buflen=4096
fio: io_u error on file /dev/nvme3n1: Operation not supported: read offset=3682716827648, buflen=4096
fio: io_u error on file /dev/nvme1n1: Operation not supported: read offset=3714437083136, buflen=4096
fio: io_u error on file /dev/nvme3n1: Operation not supported: read offset=715177566208, buflen=4096
fio: io_u error on file /dev/nvme1n1: Operation not supported: read offset=159148974080, buflen=4096
This is perplexing, considering that these are operations that NVMe drives should handle with ease. In typical NVMe operation, this command works with no trouble.
To get to the bottom of it, we looked at the io_poll parameters for the NVMe devices:
0
This shows that the I/O polling feature isn't enabled for the device nvme1n1. As if to add insult to injury, the system refuses to let us change this parameter:
[root@localhost ~]# echo 1 > /sys/block/nvme1n1/queue/io_poll
-bash: echo: write error: Invalid argument
After spending a few more hours tinkering, we discovered a peculiar situation: we could change the io_poll setting for what appeared to be a hidden path in the Native Multipath configuration of NVMe:
Curiously, though, this change did not seem to propagate to the primary block device. So we took a daring step.
We completely disabled NVMe native multipathing. We did this by adding nvme-core.multipath=N as a boot parameter. Upon reboot, something miraculous happened. The spew of errors vanished, and the devices started responding to configuration changes.
Improved Test Results
Armed with newfound control over our NVMe settings, we were eager to look at the new performance charts. And what we saw was extraordinary. Performance metrics had improved significantly; the graph now showed a nearly linear trend.

Fine Tuning the System
We then decided to push the envelope a bit more. We increased the polling queues by setting nvme poll_queues=24 and applied a few other unspecified tunings.
echo 0 | tee /sys/block/nvme*n1/queue/rq_affinity:
This command sets the rq_affinity property of NVMe drives to 0. The rq_affinity setting controls whether or not the kernel will try to send the I/O completion interrupt to the CPU that originally submitted the I/O. The values can be 0 (no CPU affinity),
echo 2 | tee /sys/block/nvme*n1/queue/nomerges:
This command disables request merging in the block layer for NVMe drives. Request merging is used by the block layer to merge adjacent I/O requests into fewer, larger requests. This can reduce the number of I/O operations and improve throughput, but it can also increase latency for individual I/O operations. By setting nomerges to 2, you're instructing the kernel not to perform any request merging. This can be beneficial for latency-sensitive workloads.
echo -1 | tee /sys/block/nvme*n1/queue/io_poll_delay:
This sets the I/O polling delay to -1 for NVMe drives. The io_poll_delay setting determines the amount of time (in microseconds) that the kernel will use busy-waiting for completion of a request, before switching to interrupt-driven completion. A value of -1 disables the busy-waiting, making the I/O completion entirely interrupt-driven. Depending on your workload, this can either improve or degrade performance.
In the `io_poll_delay` parameter lies one of the key differences between classical and hybrid polling in I/O systems. This parameter sets the delay after which the kernel starts actively polling for the completion of I/O operations.
In classical polling, `io_poll_delay` is set to a relatively low value, as the main idea is to process events as quickly as possible without waiting for interrupts. This is usually effective for high-load systems where latencies can significantly impact performance.
Hybrid polling, on the other hand, uses higher values for `io_poll_delay`. It combines the advantages of both interrupts and polling, allowing the system to remain more responsive to load changes. During periods of low activity, hybrid polling may rely on interrupts, thereby reducing CPU load, and switch to polling as activity increases.
Therefore, in hybrid polling, `io_poll_delay` is often set to optimize the balance between throughput and system responsiveness, while in classical polling, its main goal is to minimize latencies at high loads. We use classic polling for our test purposes.

The performance charts, already impressive, became absolutely stellar. However, an important footnote is that despite these remarkable improvements at the device level, the overall performance of our storage array remained unchanged!
In addition, it's important to be cautious regarding CPU load. Our settings lead to very high resource consumption in order to achieve high performance.
We were, of course, unsatisfied with the result, because we are interested not only in achieving high performance from individual drives but also in delivering that performance when operating in parity arrays. Our key goal remains the same: we aim to achieve 90-95% of the baseline performance. Further ahead, we'll explain how we solved this puzzle.
Test 4. SPDK
Armed with new insights, we decided to explore another avenue for performance improvement: SPDK (Storage Performance Development Kit).
We initiated the SPDK setup with:
We then crafted a specific script:
#!/bin/bash
# Base fio configuration file
base_fio_config="spdk_base.cfg"
# Output directory to store JSON results
output_dir="fio_results"
# Create the output directory if it does not exist
mkdir -p $output_dir
# Loop through 1 to 12 for adding drives one by one
for i in {1..12}; do
  # Generate a temporary fio config file
  temp_fio_config="spdk_temp_${i}.cfg"

  # Copy base fio config to temp config
  cp $base_fio_config $temp_fio_config

  # Add the drive sections to the temp config
  for j in $(seq 1 $i); do
    echo "[test${j}]" >> $temp_fio_config
    echo "filename=Nvme${j}n1" >> $temp_fio_config

    # Assign the correct numa node based on drive index
    if [ $j -le 6 ]; then
      echo "numa_cpu_nodes=0" >> $temp_fio_config
      echo "numa_mem_policy=bind:0" >> $temp_fio_config
    else
      echo "numa_cpu_nodes=1" >> $temp_fio_config
      echo "numa_mem_policy=bind:1" >> $temp_fio_config
    fi
  done
  # Run fio with the temp config and store the result in JSON
  LD_PRELOAD=/root/spdk/build/fio/spdk_bdev /root/fio/fio --output-format=json --output=$output_dir/result_${i}.json $temp_fio_config

  # Remove the temporary fio config file
  rm $temp_fio_config
done
and a fio base configuration designed to stretch the SPDK's capabilities:
ioengine=spdk_bdev
bs=4k
spdk_json_conf=config.json
thread=1
group_reporting=1
direct=1
time_based=1
ramp_time=0
norandommap=1
rw=randread
iodepth=256
numjobs=2
gtod_reduce=1
runtime=120
exitall

The resulting performance graph was immaculate, showing a completely linear trend.
Implementing RAID in SPDK
You may recall that our team has its own custom RAID implementation designed specifically for SPDK. We didn't miss the chance to put this to the test.
We configured two distinct RAID setups:
- A single array utilizing all available storage drives.
- Two arrays, each bound to different NUMA nodes.
We then unleashed a couple of tests on these configurations.
The first one:
ioengine=spdk_bdev
bs=4k
spdk_json_conf=RAIDconfig.json
thread=1
group_reporting=1
direct=1
time_based=1
ramp_time=0
norandommap=1
rw=randread
iodepth=128
numjobs=32
runtime=120
randrepeat=0
gtod_reduce=1
[test]
filename=raid5
The second one:
ioengine=spdk_bdev
bs=4k
spdk_json_conf=RAIDconfig2.json
thread=1
group_reporting=1
direct=1
time_based=1
ramp_time=0
norandommap=1
rw=randread
iodepth=128
numjobs=16
runtime=120
randrepeat=0
gtod_reduce=1
[test]
numa_cpu_nodes=0
numa_mem_policy=bind:0
filename=raid5
[test2]
numa_cpu_nodes=1
numa_mem_policy=bind:1
filename=raid52
We tested RAID levels 5 and 6 with a stripe size of 64k, making sure to wait for the array initialization to complete. When creating two arrays, we ensured that all drives for each array belonged to a single NUMA node.
xiRAID User Space (SPDK) Test Result
The results were staggering. We achieved 29.4 million I/O operations per second (IOps) on the single-array configuration and 30.6 million IOps on the dual-array setup.
At the same time, the performance of RAID levels 5 and 6 did not differ.
That's a 3x improvement in performance over the figures we had in the beginning of the task on an untuned system, which, even by our high standards, was an extraordinary achievement.
Test 5. libaio and Interrupt Coalescing in the Kernel Space
Having conquered the user-space with SPDK, we turned our attention back to kernel space. Could we attain exceptional performance while sticking with the standard libaio library?
A previous tweak involving interrupt coalescing, which hadn't yielded significant results on previous generations of hardware, emerged as a game-changer with our new PCIe 5 drives. For those unfamiliar, Interrupt Coalescing groups several interrupts together to reduce their overall frequency, striking a balance between CPU usage and I/O delay.
The exact settings for interrupt coalescing will depend on your workload and device specifications. The idea is to bundle several interrupts together to reduce the overall number. Too high a value can delay I/O and reduce performance, while too low can result in high CPU usage.
For example, if you want to set the aggregation time to 50µs and the aggregation threshold to 10, you would use:
Interrupt Coalescing Results
The performance graphs were intriguing. While not on par with SPDK, they were comparable to the io_uring with polling.

Array Performance in Kernel Space
With the new settings in place, we designed our fio configurations to test our RAID arrays.
As in the SPDK tests, we created one or two arrays of levels 5 and 6. When creating two arrays, we distributed them across different NUMA nodes.
Array 1:
bs=4k
direct=1
iodepth=128
numjobs=128
ioengine=libaio
rw=randread
gtod_reduce=1
group_reporting=1
norandommap=1
randrepeat=0
random_generator=tausworthe64
[file]
filename=/dev/xi_verec
Array 2:
bs=4k
direct=1
iodepth=128
numjobs=64
ioengine=libaio
rw=randread
gtod_reduce=1
group_reporting=1
norandommap=1
randrepeat=0
random_generator=tausworthe64
[file]
filename=/dev/xi_verec1
numa_cpu_nodes=0
numa_mem_policy=bind:0
[file2]
filename=/dev/xi_verec2
numa_cpu_nodes=1
numa_mem_policy=bind:1
The Results
A single array delivered a performance of 21 million IOps.
Two arrays, each on separate NUMA nodes, scored an impressive 24.2 million IOps.
As with the RAID tests for SPDK, we did not see a significant difference in performance between levels 5 and 6.
Summary
Our journey into the realms of storage performance was nothing short of remarkable. By carefully tuning interrupt coalescing, we managed to more than double the performance of RAID arrays in kernel space. Taking the path into user space with SPDK, we achieved a threefold performance increase. Truly, both realms offer fertile ground for optimizations.
The graph below demonstrates the performance difference of raw drives when using various I/O engines and different settings. On 12 drives, we were able to double the result.

Below is the performance of RAID levels 5 and 6 with various system settings


We were able to surpass 30 million IOps in user space and nearly reached 25 million IOps in the OS kernel space. This is an excellent conclusion to our research, and we are really proud of our results, which are record-breaking for fully functional arrays.
We also added figures for comparison, which show the performance of mdraid levels 5 and 6 with basic settings. We will show a more detailed comparison in the next post.

Key Takeaways
In light of our experiences, here are the key recommendations for those looking to optimize their storage performance:
1) Disable Native Multipath: If you don't require it, disable it to avoid any potential bottlenecks or issues.
2) Polling or Interrupt Coalescing: Choose one of these based on your workload and hardware capabilities. Both have shown significant impact on performance.
3) Critical Settings: Make sure to fine-tune the following:
- nr_requests: The number of I/O requests that can be in flight.
- Polling Mode: Either classic polling or hybrid.
- Hybrid Polling: If your workload allows, hybrid polling can give you the best of both worlds—low latency and reduced CPU usage.
4) Embrace SPDK: If your scenario allows for running in user-space, SPDK offers a tremendous performance boost.
5) Choose Progressive RAID Solutions: Our own xiRAID implementation is currently one of the most advanced solutions in the market, offering state-of-the-art performance and features.
When using xiraid, it's crucial to use interrupt coalescing. This creates the right balance between performance and CPU load.
Coming Soon
Stay tuned for our next article where we will perform a detailed comparison between the two RAID array implementations on a finely-tuned system.
By following these guidelines and understanding the interplay between different system components, we hope you too can achieve groundbreaking storage performance on your deployments.