This is the third and the final part of the Performance Guide. The first two parts were about performance characteristics, the ways to measure it and optimal hardware and software configurations. Now, in this concluding section, we'll be focusing entirely on RAID. We'll cover topics like choosing the right RAID geometry, configuring NUMA nodes, and conducting RAID testing. Let's dive in!
xiRAID 4.0.x
RAID geometry selection
One of the key factors in achieving optimal performance is selecting the correct RAID geometry.
The following parameters should be considered:
- The expected workload.
- The characteristics of the drives.
- The expected functionality of RAID in cases of failure and recovery.
Recommendations on selecting RAID geometry
- If you deal with a large number of random workload threads, we recommend choosing RAID 5/50 configuration (RAID 50 must have a minimum of 8 drives).
- For random workloads, it is recommended to use a strip size of 16K.
- For sequential workloads, it is recommended to use a strip size larger than 16K (such as 32K, 64K, or 128K). However, the strip size should be selected in a way that ensures the RAID stripe size is 1MB or less. If the stripe size exceeds 1MB, merge functions will not work (the merge function is explained below in this document).
- If you deal with a large number of drives and a relatively low number of writes, you can consider using RAID 6 configuration.
- Different models of drives can exhibit the best write performance when using different block sizes. For certain drives, the maximum performance can be achieved with a 128K block, while for others it may be 64K or 32K. This can only be verified by experiment. The optimal size of the data block for achieving the best performance in a RAID should be used as the RAID strip size for sequential write workload.
- For sequential write workload, it is important to find a balance between the write block size and the characteristics of the drives, as well as their number. If the write operation primarily involves the same and sufficiently large block, it is crucial to ensure that this block size matches the width of the RAID stripe.
An ideal scenario with sequential workload would involve receiving 1MB requests for writing, while the drives show their maximum performance when handling a 128K block. To achieve maximum performance for the drives, a RAID 5 configuration with 9 drives (8+1) can be created.
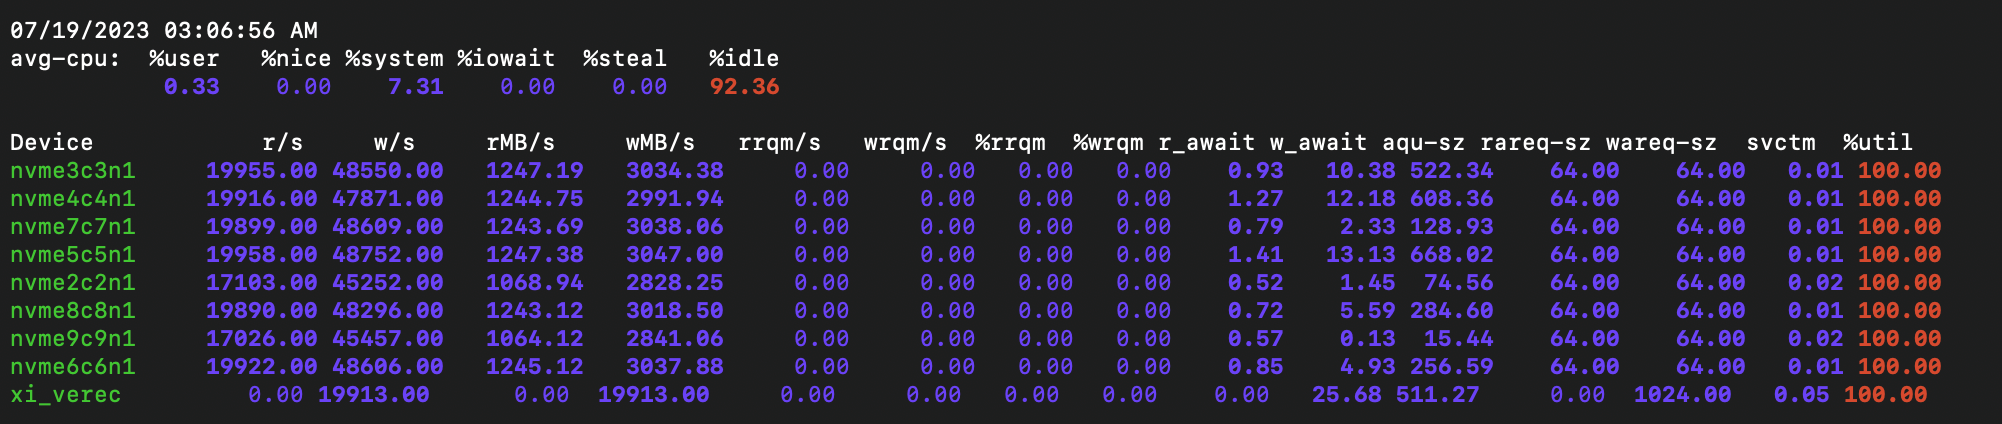
Writing with a 1MB block to a RAID 7+1 with a stripe size of 64K. The width of the stripe is 448K, which is not a multiple of the write block size. It is important to pay attention to the presence of read operations from the drives due to Read-Modify-Write operations and their volume.
Writing with a 1MB block to a RAID 8+1. The strip size here is 64K, and the width of the stripe is 64K x 8 = 512K, which is a multiple of the write block size. This means that there are no Read-Modify-Write operations, as all data on the RAID is written in full stripes (see the Merge write section below). Therefore, there are no read operations from the drives and the final write performance is significantly better.
ccNUMA
The location of arrays on the necessary NUMA nodes is crucial as NUMA can have a significant impact on system performance. xiRAID aims to process IO requests on the same cores that initiated them. However, problems can arise if the drives are on a different NUMA node.
Therefore,
- try creating arrays of drives on a single NUMA node;
- try running the workload on that same NUMA node.
To determine the NUMA node to which the device is connected, you can use the following command:
To determine the connection of all devices, including NVMe, you can use the lstopo command (mentioned above).
If you want to run fio or other applications on a specific NUMA node, you can use the taskset command.
The following fio settings can be used for multiple arrays:
- --numa_cpu_nodes=0: This option specifies the NUMA node(s) to be used for CPU affinity. In this case, NUMA node 0 is specified. You can adjust this value to the desired NUMA node(s) or a comma-separated list of multiple NUMA nodes.
- --numa_mem_policy=local: This option sets the memory allocation policy to "local," which means that memory allocation for the FIO process will prefer the local NUMA node(s) specified by numa_cpu_nodes.
All drives, except nvme9c9n1, are connected to a single NUMA node, and a load-generating application is running on the same NUMA node. You can see that the I/O commands coming to the nvme9c9n1 drive, which is connected to another NUMA node, take longer to execute. This results in reduced performance for the entire array.
Merge write
Data writing to RAID arrays with parity (such as RAID 5, RAID 6, RAID 7.3, RAID 50, etc.) is performed one stripe at a time. This process can be carried out in two ways:
- If it is necessary to write or overwrite an entire stripe as a whole, checksums are calculated based on the data that will be written in the stripe. After that, both the checksums and the data are written to the drives. This is considered the best and fastest way to write to parity RAID.
- In many cases, it is necessary to write or overwrite only a part of the stripe. In such situations, the Read-Modify-Write (RMW) approach is used. The old data that is supposed to be overwritten and its corresponding checksum fragments (R) are read from the drives. Afterward, new values for the checksum fragments (M) are calculated using the received old data, old checksums, and new data. Finally, the new data and recalculated checksums are written to the drives (W). This approach is significantly slower than the first one.
If a RAID receives random workload, the Read-Modify-Write method must be used. However, if it is known that a RAID receives sequential write workload, you can attempt to avoid executing each write command separately. Instead, you can wait for the next write commands to come to the same stripe. If you manage to receive all the commands that allow overwriting the entire stripe (which is highly possible with sequential workload), you can combine these commands (Merge) and rewrite the stripe the first way. This way you can avoid performing RMW for each of the commands and significantly increase performance (up to several times). To achieve this, use the Merge Wait function in xiRAID.
It is important to keep in mind that using merge write can have a negative impact on random operations and often leads to increased delays.
In addition, it is not always possible to merge commands into a full stripe with sequential write. The xiRAID engine ensures that confirmation of write command execution is sent to the applications that initiated them only after the data has been successfully written to the drives. In order for the merge to work, it is necessary for the program to be able to send multiple commands consecutively without waiting for confirmation of data writing from the first command. Moreover, the data from these commands should be sufficient to form a complete stripe.
For a synthetic workload, this condition can be defined as follows:
Queue depth*io size must exceed the width of the stripe
Merge is activated with the command:
Furthermore, for a workload, it is necessary to monitor the iostat indicators. The statistics output by the "iostat -xmt 1" command appear to be convenient for this purpose.
The presence of read operations on drives with a write-only RAID load indicates the execution of read-modify-write operations.
The next steps will involve increasing the mm and mw parameters until the read operations either disappear completely or their value becomes small.
The merge function only works on a RAID with a stripe size of 1MB or less.

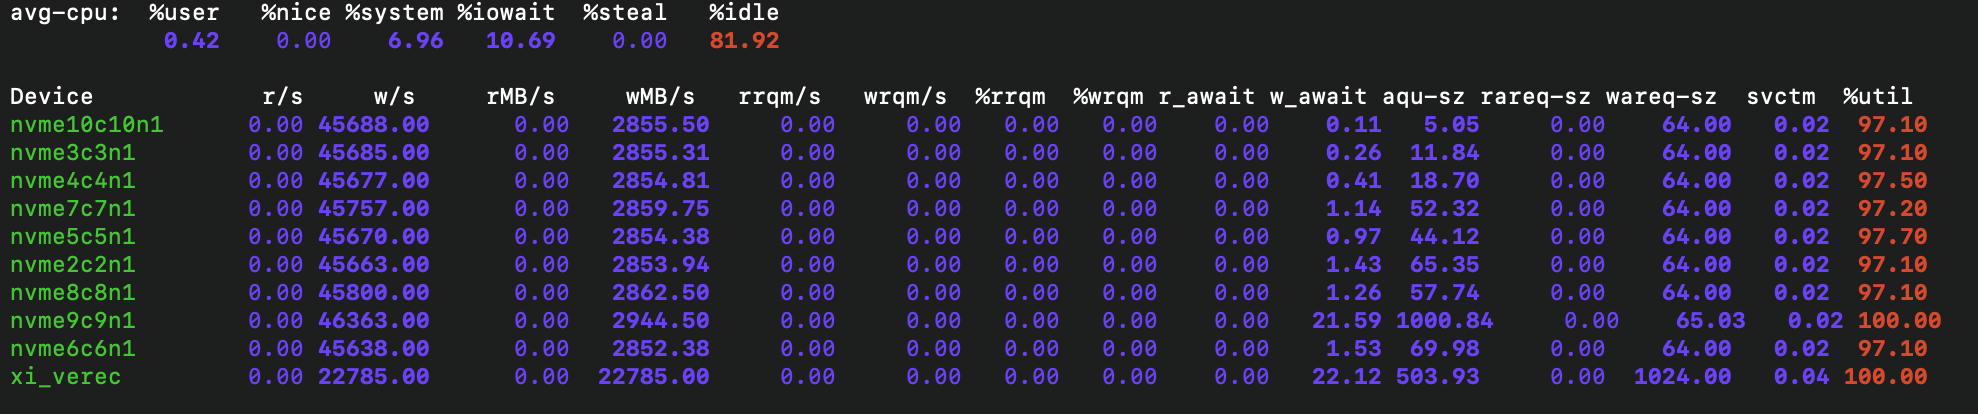
Writing with a 1MB block to a RAID 7+1 with a stripe size of 64K. The width of the stripe is 448K, which is not a multiple of the write block size. The configuration is similar to the one shown in picture 1, with the only difference being that Merge Write is enabled on the RAID. This allows for writing to be performed in full stripes, which results in significantly higher writing performance.
Writing with a 1MB block to a RAID 7+1 with merge enabled
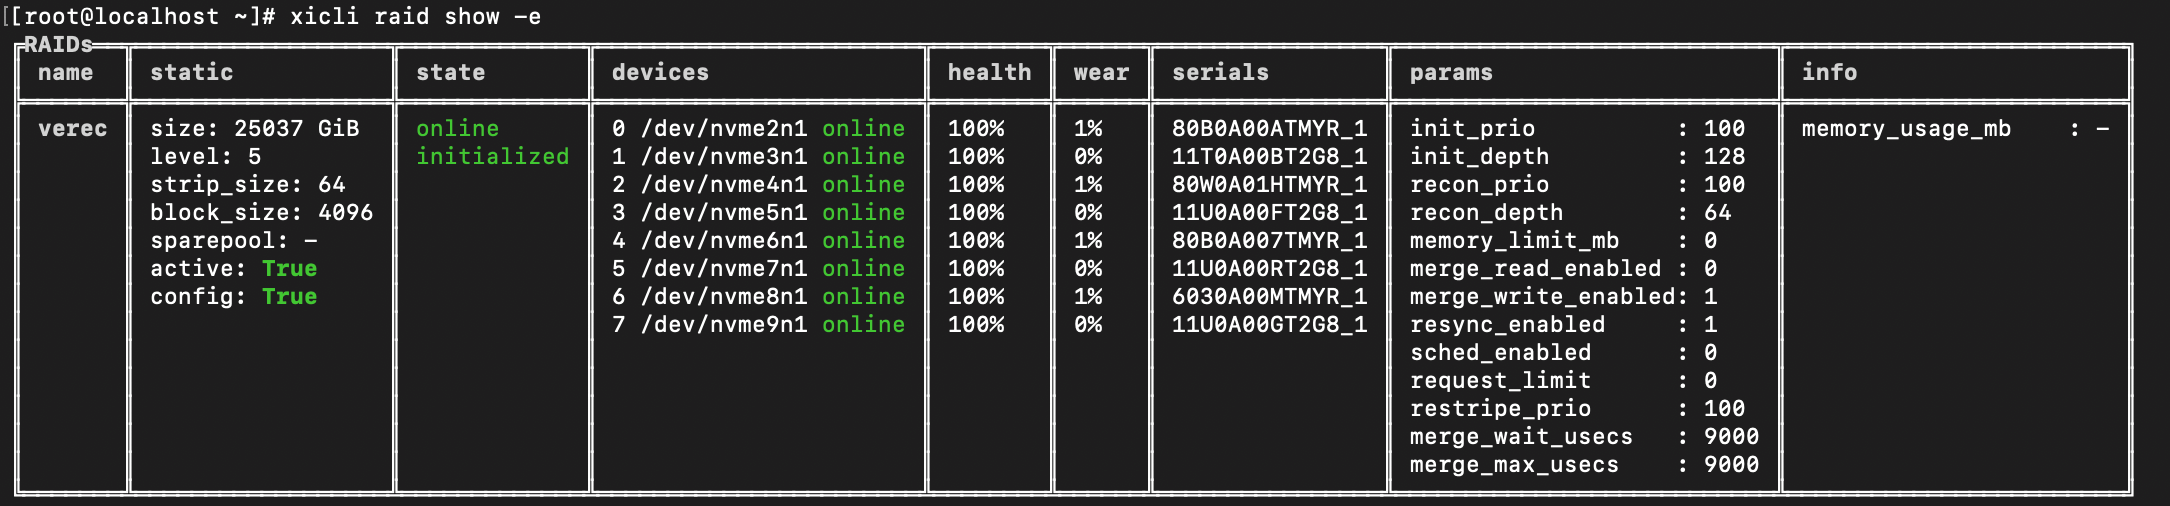
This picture shows the RAID configuration, while the previous picture displays the corresponding workload. Note that the merge_write_enabled parameter is set to 1.
Merge read settings
Performing a merge for read operations may not seem obvious, but it can significantly enhance the efficiency of RAID in degraded mode. This mode refers to the situation when one or more drives fail in the RAID system, but it has not went offline. In this situation, using merge for read operations allows you to reduce the number of commands needed to calculate and restore data from a failed drive (or drives). This, in turn, significantly improves performance.
The requirements for efficient operation of merge for read operations are similar:
the queue depth * IO size must exceed the width of the stripe.
Merge for sequential read operations in failure mode is configured as follows:
- Enabling xicli raid modify -n raidname -mre 1.
- In degraded mode, it is important to monitor the need for increasing timeouts when using iostat. If the total number of reads from the drives exceeds the number of reads from the array, it is necessary to increase the delays of mw and mm. For example:
In the current versions of xiRAID (4.0.0 and 4.0.1), there is a common threshold value of merge_wait (mw) and merge_max (mm) for Merge Write and Merge Read, which can make it difficult to use them simultaneously. This issue will be addressed and fixed in future versions.
Sched setting
xiRAID attempts to process each I/O on the same core where it was initiated by the application or drive. However, this approach results in limited parallelization of processing when dealing with multithreaded loads.
If you notice that the number of threads in your workload is low and the htop command indicates a high workload on certain cores while others remain idle, it is advisable to enable the sched mode:
This mode distributes processing tasks across all available cores.


These pictures show the performance of xiRAID RAID when the sched mode is turned off and the loading of RAID engine processor cores. You can see that only 4 cores are being loaded.


These two pictures show the performance of this xiRAID RAID under the same load, with the sched enabled. The performance has significantly improved, while also ensuring a more balanced distribution of the load on the processor cores.
Init and rebuild priorities
You can manage the service request queue depth, which enables you to allocate system resources between user IO and in-system processes.
The general scenario is as follows: if you are unsatisfied with performance parameters or experiencing delays when testing performance during array recovery or initialization (although we do not recommend the latter), you have the option to reduce the priority of these operations.
RAID testing
RAID testing is generally similar to drive testing, although there are some differences.
Workflow
This section outlines the main objectives discussed in the previous sections.
- Define RAID performance testing tools and objectives. Use applications such as fio or vdbench for system testing. Do not use dd utilities and desktop applications like Crystal Disk.
- Test the drives and backend as described above in the "Drive Performance" section.
- Choose the array geometry that is best suited to your tasks, as described in the "xiRAID 4.0.x" section.
- Determine the expected RAID performance levels based on the tests conducted on the included drives (as described in the "Drive Performance" section above).
- Create the RAID and wait for the initialization process to complete.
- Run the pre-conditioning on the array. Then, run tests on the array and adjust the parameters if necessary.
- Make sure to perform array tests, including during simulated failure (degraded mode) and ongoing reconstruction (reconstruction mode).
If you are testing in accordance with this document, steps 2-4 should already be completed.
Pre-conditioning and typical settings
In order to obtain repeatable performance results, it is necessary to prepare the drives beforehand. As mentioned above, when preparing individual drives, we recommend following the guidelines provided in the “Drives Performance” section:
- before testing sequential workload: overwrite all drives sequentially with a 128K block;
- before testing random workload: overwrite all drives randomly with a 4KB block.
During RAID testing, it is possible to overwrite drives with a 128K or 4K block, but this can only be done before the RAID is assembled. Once the RAID is assembled, writing directly to the drives is not possible, as it would result in the loss of RAID metadata and the RAID itself. At the same time, after the RAID is created, all disks will be partially overwritten by a block equal to the size of the strip during initialization.
This makes it difficult to apply this approach in practice. Thus, we suggest performing pre-conditioning as follows:
- before testing sequential workload, the entire RAID should be overwritten (preferably 1.5 - 2 times) sequentially with a block equal to the size of the RAID strip. Then each drive will be overwritten sequentially, with a block equal to the size of the strip (chunk). This method ensures that the RAID performance reaches a steady state corresponding to the selected chunk size during its creation.
- before testing random workload, it is recommended to initiate a random write workload to a RAID with a 4K block size and a number of threads equal to the number of processor threads in the system. The duration of the writing process should be set to 30-40 minutes.
Performance troubleshooting
If you are not getting satisfactory results, we recommend using the following tools to analyze the problem:
iostat
Pay attention to the statistics of the drives included in the RAID. If you see a high load on one or more drives, indicated by a growth in command queues, we recommend doing the following:
- Check the distribution of drives among NUMA nodes.
- Ensure the correctness of the offset setting for multithreaded tests.
- If a drive is consistently slower than others for an extended period of time, with a significantly larger queue of commands, it should be replaced.
htop
If you notice a high consumption of CPU resources, you should check the following:
- For AMD processors, it is necessary for the number of cores (die) on each chiplet to match the number of cores given in specifications (in the BIOS settings).
- Ensure that all processor memory channels are utilized by memory modules. Install the memory modules according to the motherboard's manual and ensure that they operate at the same frequency.
- Run the "dmesg" command and check its output for memory errors, as well as any other hardware errors.