
Before updating
This section outlines the necessary steps that need to be taken prior to updating xiRAID Classic 4.0.0, 4.0.1, 4.0.2, 4.0.3 and 4.0.4 to xiRAID Classic 4.1.0. These steps are applicable to all systems.
- Make sure your system meets the requirements listed in xiRAID Classic 4.1.0 System Requirements.
-
For xiRAID Classic 4.0.1-4.0.4, update you local package index and cached packages:
- For apt:
# apt update - For yum/dnf:
# yum clean all
- For apt:
- For xiRAID Classic 4.0.1-4.0.4, make sure the new
xiRAID Classic version is available for
update:
# xicli update check - Stop using the xiRAID devices:
- Disable all the applications that are using the xiRAID devices.
- Unmount all file systems that use the xiRAID devices (using umount,
systemd or other suitable tool) and disable automatic mounting of file
systems at system startup. For example, if you use the mounting approach
described in 'File System Mounting Aspects' section in xiRAID Classic 4.0.1 Administrator's Guide, do the
following:
- if automatic mounting was enabled through
systemd.mount, stop the service that mounts file systems for all xiRAID devices:
Disable the automatic mounting service for all xiRAID devices at system startup:# systemctl stop mnt-raid.mount# systemctl disable mnt-raid.mount - if automatic mounting was enabled through
/etc/fstab, unmount all file systems that use the xiRAID devices (using umount or other suitable tool):
Comment out the lines in the /etc/fstab file that are responsible for automatic mounting of the xiRAID devices. To do this, insert a comment symbol (#) before those lines. For example:# umount /dev/xi_<device_name># /dev/xi_raidname /mnt/raid/ xfs x-systemd.requires=xiraid-restore.service,defaults 0 0 - make sure all file systems that use the xiRAID devices are
unmounted:
# df -h
- if automatic mounting was enabled through
- Make sure that all RAIDs are in the state “online” (for RAID 0) or
“online, initialized” (other RAID configurations):
# xicli raid showFigure 1. Command output example 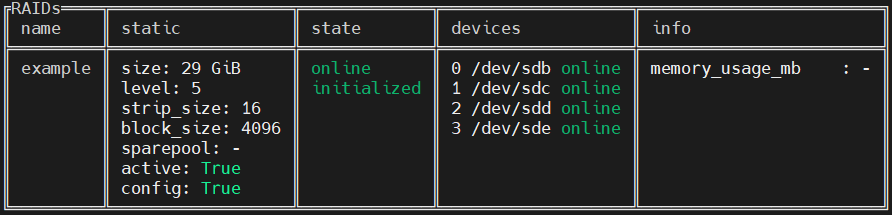
-
Copy the xiRAID Classic configuration file to the home directory (or any other directory of your choice) as a backup in case the update does not complete successfully:
cp /etc/xiraid/raid.conf ~/
Ignoring these steps may result in filesystem panic and even data loss.
xiRAID is installed on the active kernel version of your OS and supports regular kernel updates by automatically rebuilding its kernel module. However, if your system has multiple kernel versions installed and xiRAID is not installed on the latest one, it will not function correctly when switching to the latest kernel version. Make sure you are booted into the correct kernel version if you want to install xiRAID on it.
- Boot into the desired kernel.
- Install the development kernel-headers package for the current kernel (see the xiRAID Classic 4.1.0 Installation Guide for the specific command for your distribution).
- Run:
# dkms autoinstall# systemctl restart xiraid.target