ZFS is a popular file system that has managed to step far beyond the workstation and is actively used both in server solutions and for creating storage systems and specialized devices. This is due to the rich functionality and flexibility inherent in the solution architecture.
However, not everyone manages to get the necessary level of file system performance when using modern hardware. The reason for this is the need for fine-tuning and several practical features of ZFS.
In this article, we will describe how to maximize the performance of the ZFS file system when it manages 16 NVMe drives under sequential workloads.
We will tell you how by applying a number of optimizations we were able to increase the performance of the file system by 5 times and then by replacing RAIDZ with our own xiRAID engine we got another 2 times performance gain, reaching the hardware limits.
The article will be useful for building the following types of solutions:
- Lustre parallel file system cluster that uses ZFS on object storage devices (OSD) and needs to provide high-performance back end.
- All Flash Backup targets. The backup of modern AFAs requires keeping backups with the performance level in line with the primary storage.
- Data capture solutions. Such solutions can be relevant in the cybersecurity space, 5G base station development and testing, and beyond.
- Storage for video post-production and other Media and Entertainment sequential workloads.
Tests and configuration
Let us get started with the tests and the configuration of our file system.
Test bench configuration:
- CPU: AMD EPYC 7702P (64 cores @2.0 GHz base)
- RAM: 128GB
- NVMe: 16 Western Digital UltraStar SN840 3.2TB
- OS: Oracle Linux with 5.4.17-2102.203.6.el8uek.x86_64 kernel
We will start by measuring raw device performance to establish a baseline:
- Sequential reads (16 drives raw): 57.2 GB/s
- Sequential writes (16 drives raw): 53.2 GB/s
ioengine=libaio
direct=1
bs=128k
rw=read, write
iodepth=32
numjobs=4
runtime=600
time_based=1
offset_increment=15%
[job]
filename=/dev/nvme0n1
[job1]
filename=/dev/nvme1n1
[job2]
filename=/dev/nvme2n1
[job3]
filename=/dev/nvme3n1
[job4]
filename=/dev/nvme6n1
[job5]
filename=/dev/nvme7n1
[job6]
filename=/dev/nvme8n1
[job7]
filename=/dev/nvme9n1
[job8]
filename=/dev/nvme10n1
[job9]
filename=/dev/nvme11n1
[job10]
filename=/dev/nvme12n1
[job11]
filename=/dev/nvme13n1
[job12]
filename=/dev/nvme14n1
[job13]
filename=/dev/nvme15n1
[job14]
filename=/dev/nvme16n1
[job15]
filename=/dev/nvme17n1
The result is not bad, this is a lot of storage I/O power, we can fully saturate two 200 Gbit/s ports for read and write-intensive sequential tasks. That is if the software does not become a bottleneck.
Now let us check the performance of ZFS. Download the archive and build ZFS: zfs-2.1.9
./configure
make -j
make install
Create a filesystem:
We will do a thorough test by changing the number of files and performing 10 rounds of tests (or more to get stable results). We will test through the ZPL: it is a POSIX-compatible FS interface.

ioengine=libaio
direct=1
bs=1M
rw=write, read
iodepth=32
numjobs=8, 16, 64
runtime=600
time_based=1
size=100G
[job]
directory=/test
| Number of jobs | 8 | 16 | 64 |
| Sequential writes GB/s | 5.3 | 5.5 | 5.5 |
| Sequential reads GB/s | 5.4 | 5.5 | 5.6 |
Out of the box ZFS results
Our default ZFS filesystem performs at around 10% of the drives’ maximum.
Let us move forward and do some tuning.
First, we are going to change ashift and recordsize parameters:
ashift tells ZFS what the underlying physical block size your disks use is. It’s in bits, so ashift=9 means 512B sectors (used by all ancient drives), ashift=12 means 4K sectors (used by most modern hard drives), and ashift=13 means 8K sectors (used by some modern SSDs).
If you get this wrong, you want to get it wrong high. Too low an ashift value will cripple your performance. Too high an ashift value won’t have much impact on almost any normal workload.
Ashift is per vdev, and immutable once set. This means you should manually set it at pool creation, and any time you add a vdev to an existing pool, and should never get it wrong because if you do, it will screw up your entire pool and cannot be fixed.
If you’re only reading and writing in fairly large chunks you’ll want to set recordsize=1M, to reduce the IOPS load on the system by requiring fewer individual records for the same amount of data. This can also increase compression ratio, for compressible data, since each record uses its own individual compression dictionary.
We will set ashift=12 as recommended for NVMe and recordsize=1M because we are doing sequential IO.
| Number of jobs | 8 | 16 | 64 |
| Sequential writes GB/s | 10.5 | 9.8 | 9.8 |
| Sequential reads GB/s | 10.9 | 10 | 11 |
ZFS results with initial tuning of ashift and recordsize
The results are twice as good as our first run, and now we can utilize the performance of one 100 Gb/s port.
Moving on we can disable several functions: checksum=off, atime=off, dedup=off, compression=off
We can also adjust logbias=throughput, xattr=sa
The logbias property – You can use this property to provide a hint to ZFS about handling synchronous requests for a specific dataset. If logbias is set to latency, ZFS uses the pool's separate log devices, if any, to handle the requests at low latency. If logbias is set to throughput, ZFS does not use the pool's separate log devices. Instead, ZFS optimizes synchronous operations for global pool throughput and efficient use of resources. The default value is latency. For most configurations, the default value is recommended. Using the logbias=throughput value might improve performance for writing database files.
ZFS on Linux stores xattrs in a hidden folder, as regular files! This is very slow, requiring multiple seeks per xattr, and it doesn't appear to cache very well either. The fix is to store the data in the inodes.
| Number of jobs | 8 | 16 | 64 |
| Sequential writes GB/s | 11.3 | 12 | 12.5 |
| Sequential reads GB/s | 11.8 | 13.3 | 13.6 |
ZFS results after 2nd round of tuning (checksum=off, atime=off, dedup=off, compression=off, logbias=throughput, xattr=sa)
The result is almost three times better than the initial run, but still far from perfect.
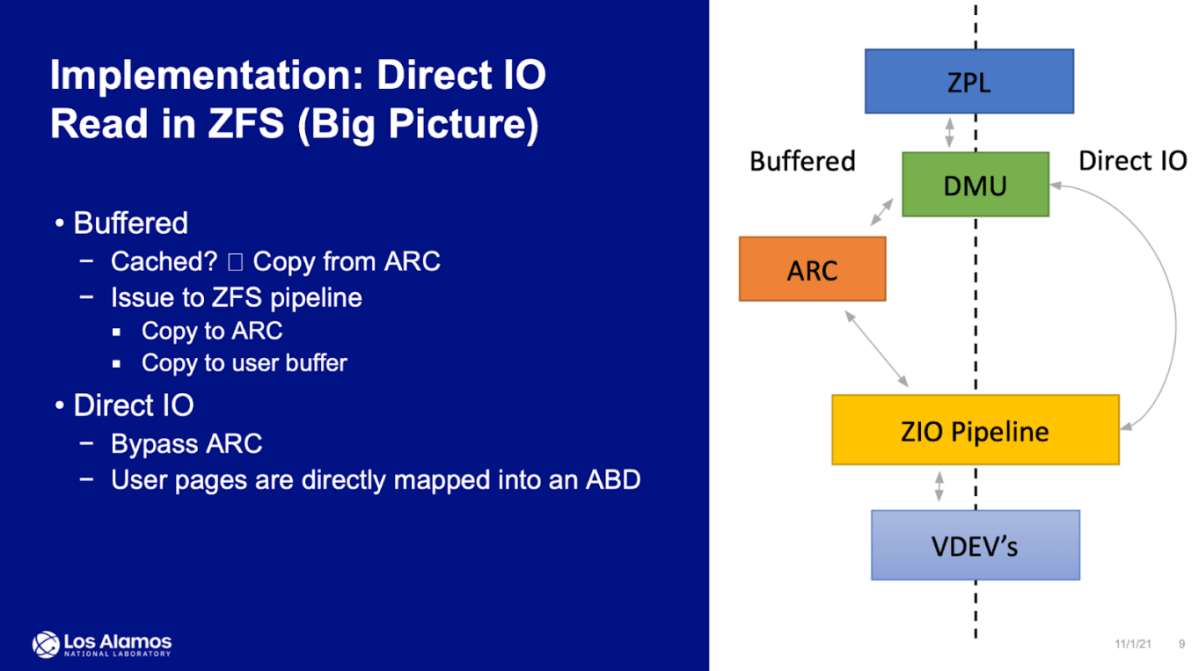
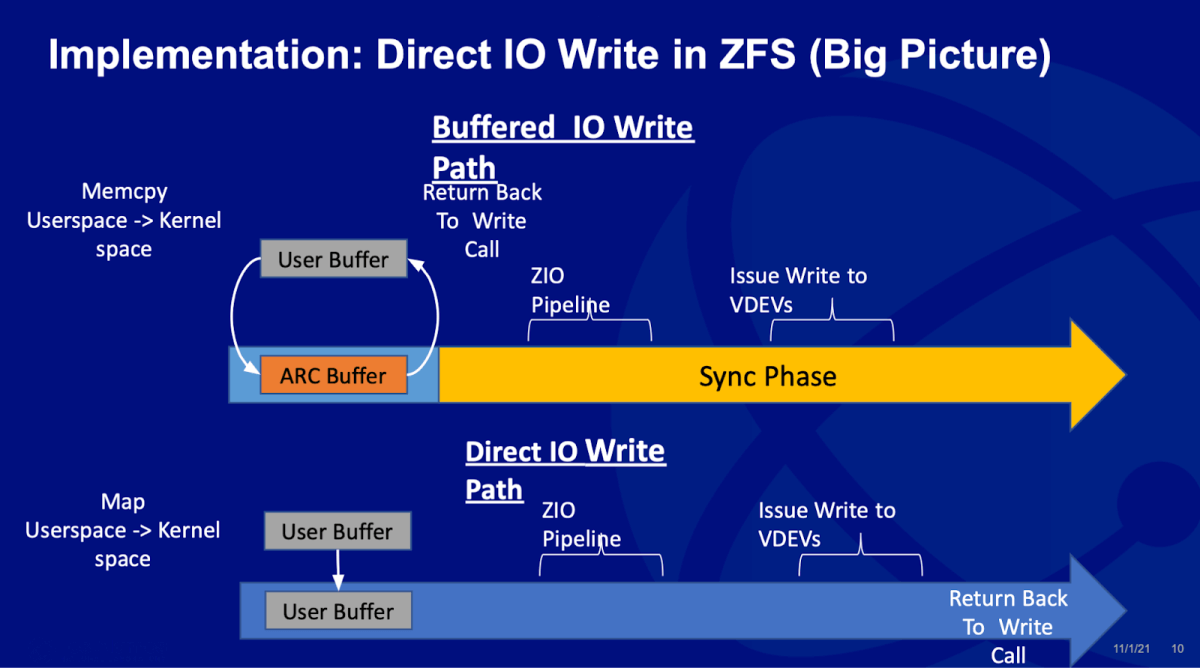
I first saw the results of integrated support at the OpenZFS summit in 2021. Previously ZFS simply ignored the O_DIRECT flag and all requests went through ARC anyway. This is not always good, as additional memory copy has a substantial impact on performance.
But enough theory, let us run the tests. And you can see the presentation for yourself: https://docs.google.com/presentation/
cd zfs
git checkout remotes/origin/direct_page_aligned
sh autogen.sh
./configure
make -j
make install
After that, the pool gets a new property direct with the default value standard.
We will re-create the pool with our tuning options and direct IO:
| Number of jobs | 8 | 16 | 64 |
| Sequential writes GB/s | 16.0 | 21.5 | 25.4 |
| Sequential reads GB/s | 15.7 | 26.4 | 30.6 |
ZFS results after 3rd round of tuning – adding Direct IO
This is finally starting to look interesting! Let us take a look at htop:
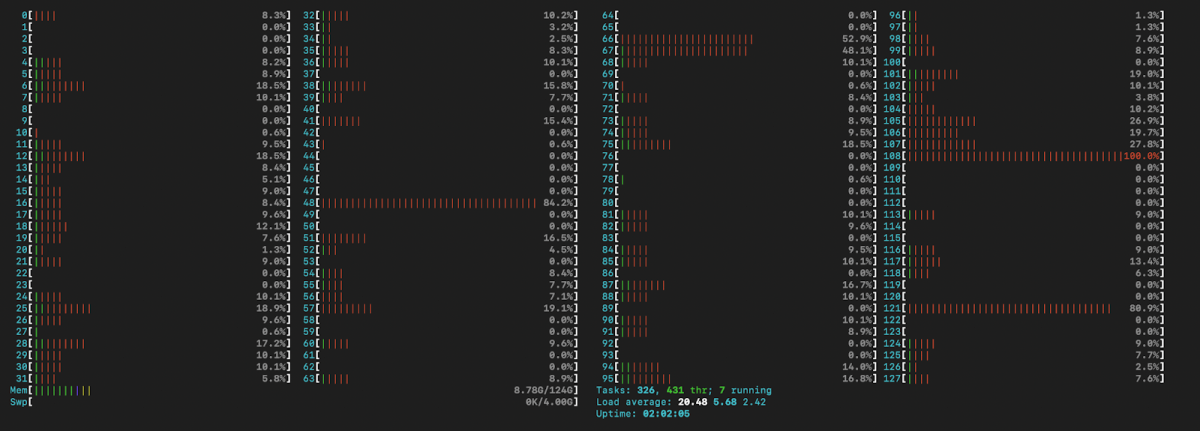
We can see that some of the cores are close to 100% loaded.
Let us do some further testing in different RAID configurations.
We will test different RAID configurations at maximum load, because this approach demonstrates the maximum difference between arrays:
| 64 jobs RAIDZ |
64 jobs RAIDZ2 |
64 jobs Stripe |
|
| Sequential writes GB/s | 25.4 | 24.2 | 49.7 |
| Sequential reads GB/s | 30.6 | 32.3 | 32.1 |
| Degraded reads GB/s | 29.2 | 28.0 | NA |
ZFS results after 3rd round of tuning and adding RAID and striping
On writes we only have half of the maximum performance using RAIDZand RAIDZ2. Reads on striped volume are surprisingly worse than writes.
Can we increase the file system performance further?
We replaced RAIDZ with our xiRAID levels 5 and 6.
Replacing RAIDZ with xiRAD is not a difficult task:
- We install xiRAID using the instructions from our website:
https://xinnor.io/files/Xinnor_xiRAID_Installation_Guide.pdf - Then we create a RAID of the desired level using xicli
- And then create a pool with a single device:
That’s it! Now you have ZFS running on top of xiRAID!
Here are the results we got from testing:
| 8 jobs | 8 jobs | 16 jobs | 16 jobs | 64 jobs | 64 jobs | |
| xiRAID level | RAID5 | RAID6 | RAID5 | RAID6 | RAID5 | RAID6 |
| Writes | 39.0 | 34.7 | 46.9 | 40.3 | 51.4 | 47.4 |
| Reads | 37.0 | 37.1 | 46.6 | 44.6 | 57.2 | 52.9 |
| Degraded reads | 33.4 | 33.1 | 37.3 | 36.4 | 47.2 | 45.3 |
Final results after replacing RAIDZ/RAIDZ2 with xiRAID
You can see how much data went directly and through the ARC:
cat /proc/spl/kstat/zfs/test/iostats
19 1 0x01 26 7072 185559663116 349705896946
name                            type data
trim_extents_written            4    0
trim_bytes_written              4    0
trim_extents_skipped            4    0
trim_bytes_skipped              4    0
trim_extents_failed             4    0
trim_bytes_failed               4    0
autotrim_extents_written        4    0
autotrim_bytes_written          4    0
autotrim_extents_skipped        4    0
autotrim_bytes_skipped          4    0
autotrim_extents_failed         4    0
autotrim_bytes_failed           4    0
simple_trim_extents_written     4    0
simple_trim_bytes_written       4    0
simple_trim_extents_skipped     4    0
simple_trim_bytes_skipped       4    0
simple_trim_extents_failed      4    0
simple_trim_bytes_failed        4    0
arc_read_count                  4    8192
arc_read_bytes                  4    8589934592
arc_write_count                 4    1509
arc_write_bytes                 4    73656
direct_read_count               4    592857
direct_read_bytes               4    621655621632
direct_write_count              4    1873301
direct_write_bytes              4    1964298469376
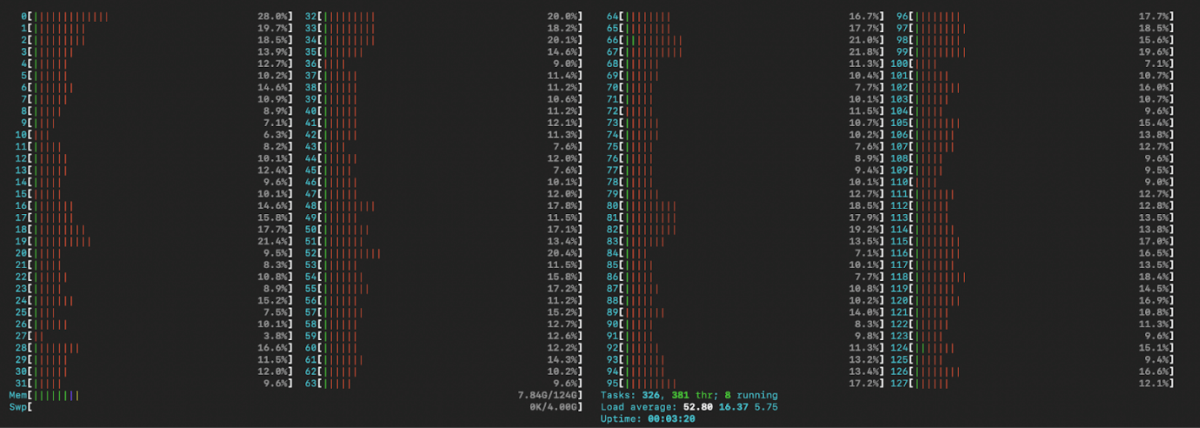
Let us check CPU load at maximum workload:
| 8 jobs | 8 jobs | 16 jobs | 16 jobs | 64 jobs | 64 jobs | |
| xiRAID level | RAID5 | RAID6 | RAID5 | RAID6 | RAID5 | RAID6 |
| Writes | x2.4 | x2.2 | x2.2 | x1.9 | x2 | x1.9 |
| Reads | x2.4 | x2.4 | x1.8 | x1.7 | x1.9 | x1.7 |
| Degraded reads | x2.2 | x2.2 | x1.4 | x1.4 | x1.6 | x1.6 |
xiRAID performance multiplier vs RAIDZ
Conclusion
We have managed to improve the performance of the file system by nearly x10.
To do that we used our proprietary technology (xiRAID) and disabled several popular features.
In the next articles we are going to tell you about optimization of work on small block loads and check how we can bring some of the disabled features back without a great loss of performance.
All this will be accompanied by a more detailed tracing of the file system.